Monday, December 17, 2012

Midnight Assignments - How do you set the date and time?

by Alan Regan

"I have an assignment due at midnight. How do I enter the date and time?"


This tip comes from one of our professors, Dr. Chris Heard of Seaver College's Religion Division.  Dr. Heard had an assignment due at midnight and he wasn't sure how to record the time.  Does he record the time as 24:00:00 (PM) on the day the assignment is due or 00:00:00 (AM) the next day?

Let's say that you want to have students submit an assignment by midnight on Tuesday, June 18, 2013.  You would set the due date to Wednesday, June 19, 2013 at 00:00:00 AM.

Courses (powered by Sakai) will not accept 24:00:00 PM as a valid date.  The correct option for midnight is 12:00 AM the following day or 00:00:00 in military time.

Several other professors have chosen to simply set the deadline to 11:59:59 PM the day of the due assignment as another workaround.

Example 1: Activity is due at midnight on Tuesday, June 18, 2013 (they have all day Tuesday to complete the activity)
  • Assignments: Jun 19 2013 12:00 AM
  • Forums: 6/19/2013 12:00 AM
  • Tests & Quizzes: 06/19/2013 00:00:00 AM
Example 2: Activity is due at noon on Tuesday, June 18, 2013 (they have until midday Tuesday to complete the activity)
  • Assignments: Jun 18 2013 12:00 PM
  • Forums: 6/18/2013 12:00 PM
  • Tests & Quizzes:  06/18/2013 12:00:00 PM

We hope this "time" tip helps you in future assignments!

Friday, December 14, 2012

Mobile Development Options - Part 1: Overview

By Mark Giglione

Mobile Development Options - Part 1: Overview

This series will provide brief introductions to options for mobile app development with links to pursue each topic in more depth. The general plan is to begin with technologies that do not require a background in programming (or otherwise require traditional programming skills) and then explore options that progressively involve acquiring more technical expertise.

Part 1: Overview
Part 2: MIT App Inventor
Part 3: Mobile Web Development with Dreamweaver
Part 4: Titanium Appcelerator & Titanium Studio
Part 5: Processing
Part 6: Xcode for Apple iOS Development
Part 7: Eclipse for Android Development
Part 8: Other Tools and Wrap-Up


Overview

There are two primary strategy choices for creating mobile applications. The first is to create a ‘native’ application targeted for a specific device or device operating system (e.g. iOS devices, such as an iPad or iPhone, and Android devices like the Amazon Kindle). The second is to develop a website or web application that is designed for viewing by a mobile device.  

A native application is tailored and optimized for use on a specific device and is usually distributed through an online marketplace (for example  iTunes for iOS devices). Typically a native application requires the use of a traditional computer programming environment such as Xcode or Eclipse (but alternative development approaches are available).  

Mobile websites and mobile web applications can have a similar look and interface conventions as a native mobile application but are created using the tools and technologies that are typically used to create conventional web sites (e. g. HTML, CSS and Javascript). This has the advantage of utilizing tools that may already be familiar from previous web development work and the web based application is directly accessible from the web without first being downloaded and installed. While a native application may be a better choice where performance or device specific features are required, mobile web applications can be quite suitable for implementing simple to moderately complex applications. Mobile web applications are for the most part inherently “cross platform” since they are web rather than device based. Additionally, many mobile web applications can also be packaged and distributed as a standalone native applications.

The next installment will discuss the open source MIT App Inventor tool which uses codeless “visual” programming for creating native Android applications. App Inventor is also representative of a class of mobile development tools where the development environment is web based (rather than running on the desktop) but the final product is a native application.

Thursday, December 6, 2012

Get Citations Right Through Pepperdine Libraries Search

by Alan Regan

Citing Made Easy: Leverage Pepperdine Libraries Search


You've asked your students to write a research paper but their citations are incorrect or consistent. In addition to pointing them to Pepperdine Libraries' valuable research tips, you can also point them to a solution that has likely been staring them in the face.

To find books and articles on a desired research topic, your class is hopefully taking advantage of the many physical and digital resources offered by our Pepperdine Libraries.  These materials are available through a powerful, central search tool, powered by WorldCat.  In addition to finding these resources, the tool will also provide the correct citation based on several common formats.

Instructions:

  1. Visit http://library.pepperdine.edu.
  2. Enter your search term or book title in the main search box.

  3. Click the title of a search result.
  4. Click "Cite/Export" in the options near the top right, next to "Print" and "Email."
  5. Click the desired format, e.g. APA, Chicago, Harvard, MLA, and Turabian.
  6. Copy the full citation.

It's that easy to find the correct citation for a book, article, or other resource.

Friday, November 30, 2012

Social Learning

by Hong Kha

Encouraging Social Learning Tools in the Classroom


We still have faculty who forbid students from using their cell phones and laptops in class because they don't want students to be distracted. I say take those weaknesses and turn them into strengths. Engage your students by using their own devices. Tools such as Today's Meet, and Poll Everywhere can help you incorporate social learning to help your students interact and understand the material you're teaching. Websites like http://todaysmeet.com lets you create a back channel allowing students to comment or ask questions while you lead a class lecture or discussion. Other sites such as http://www.polleverywhere.com allows you to create an interactive poll to get a pulse on student understanding during a lecture. Sites like these empower students to interact during class lectures by using their own laptops and smart phones. With today's technology, I'd encourage you to stop discouraging the use of technology in the classroom but to allow them to empower you in new ways of engaging your students in the classroom.


Poll Everywhere
http://www.polleverywhere.com

Today's Meet
http://todaysmeet.com

ELI 7 Things You Should Know About Backchannels Communication, Educase
http://www.educause.edu/library/resources/7-things-you-should-know-about-backchannel-communication

Summary of Social Development Theory by Vygotsky
http://www.learning-theories.com/vygotskys-social-learning-theory.html

Sunday, November 18, 2012

Finding free images in a Google Image search

by Alan Regan

Google Images: Finding Photos You Can Freely Use


There are millions of photos and graphics available on the web. Some of these images we can use freely in our presentations or materials, others we can't because they are covered by copyright restrictions. How do we find the images we can freely use?

One way is by using the advanced features in Google Image search.

Instructions:

  1. Visit http://www.google.com and click Images in the top menu. (You may also visit http://images.google.com.)
  2. Enter your search term, e.g. "desert."
  3. On the listings page, click the gear icon (Options) at the top right.
  4. Select Advanced Search.
  5. Scroll down to the "Usage rights" option.
  6. Select "Free to use or share" or "Free to use or share, even commercially," depending on your needs.
  7. Click Advanced Search.
  8. The results will be filtered by images listed under Creative Commons licenses.

Other Sources:


Reminders:


Of course, you still need to do your homework. Don't assume each image is automatically free to use. Visit the site and view the page for information on the Creative Commons license used and/or any other notice the copyright owner may have added to the page.

Just as we cite sources in our academic writing, we must also cite our use of images. Be sure to place a "Photo By" credit near the image and place the full citation on your works cited page or slide. Although MLA doesn't seem to require it, I always like to place the web address (URL) in the citation.

Finally, many of these images, especially from Google searches, will come from third-party websites.  Use normal caution when browsing unknown websites. Be sure your anti-virus software is enabled and up-to-date. Also, read the pages carefully. Some advertisements are deceptive and you may accidentally click on an ad rather than the view or download button for a photo. When in doubt, close the window or cancel the download.

I hope this information helps you find images you can freely use in instruction or speaking events!

Friday, November 2, 2012

Embedding a Google Doc Into Courses


by Landon Phillips

Using Resources to Link a Google Doc Into Courses


Google Docs offers a fantastic way to enable students to collaborate on group projects or create living documents that can be shared with the entire class. But did you know that you can embed these documents directly into your Courses site? The Resources tool enables you to do this.

  1. Open up the Google Doc you’d like to share, and click the blue Share button in the top right of the screen.
  2. By default, the document will be set to "Private - Only the people listed below can access." Click the blue Change... link to the right.
  3. Select the option "Anyone with the link."
  4. (Optional) If you’d like your students to be able to edit the document in addition to simply seeing it, click the blue "can view" drop down button, and then select "can edit."
  5. Click the green Save button.
  6. At the top of the share window, you'll see the "link to share." Copy that link by right clicking it and selecting "Copy." You can also use the keyboard shortcuts CTRL-C (Windows) or Command-C (Mac).
  7. Log into Courses and click the tab for your site.
  8. Click Resources in the left menu.
  9. Click Add next to the folder into which you want to place the link.
  10. Select Add Web Links (URL).
  11. In the ‘Web Address (URL)’ box paste your Google Doc link by right clicking and selecting "Paste." You can also use the keyboard shortcuts CTRL-V (Windows) or Command-V (Mac).
  12. In the "Website Name" box enter a title for the Google Doc link as you’d like it to appear for your participants.
  13. Click Add Web Links Now.
The Google Doc is now available to your site participants.

Did you know you can also link to a Google Doc as your class syllabus? You can either place the link in Resources or use the "redirect" feature in the Syllabus tool.

Monday, October 29, 2012

Instructional Designer Resources

By: Hong Kha

Resources for Instructional Designers


As an instructional designer, I always try to keep a pulse on the latest and greatest teaching tools and pedagogy tips that can help me advise faculty on how they can engage students. Here are a few sites that I turn to when I need inspiration.

FACULTY FOCUS:

Is a site targeted towards faculty. This site has provided me with a lot of pedagogy tips on how to improve student learning whether in a face-to-face or online setting. The articles here have served as a faculty mentor for when I run into a teaching experience that can only be advised by another faculty. 
http://www.facultyfocus.com/

EDUCAUSE:

Educause ELI is a great way to keep a pulse on what universities are doing to keep on top of the teaching with technology innovation curve. I've enjoyed reading their "7 Things You Should Know About …" to get brief tips about new pedagogy concepts, such as teaching with badges or the evolution of textbooks.
http://www.educause.edu/eli

Educause also publishes an annual review of education technology trends that help predict where we're heading in one year, three years, and five years from now. This has been really beneficial for strategic planning on what we should build into our Faculty Professional Development training program.
http://www.educause.edu/library/resources/2012-horizon-report

OTHER RESOURCES:

Then there are the techie tips sites. Here are a few links that are geared towards teaching.
Authentic Assessment Toolbox: http://jfmueller.faculty.noctrl.edu/toolbox/index.htm
Edudemic (news and latest trends):
 http://edudemic.com/
 http://edudemic.com/2011/11/best-web-tools/

If you're more interested in listening to podcasts rather than reading newsletters then here is a great podcast you can subscribe to: Chronicle of Higher Ed: Tech Therapy
Subscribe here: https://itunes.apple.com/us/podcast/chronicle-higher-education/id261225205

I hope you enjoy these resources.

Tuesday, October 23, 2012

Exploring "Open Source"

By Mark Giglione

What Open Source Tools Have To Offer


"Open source" software includes applications that are are offered freely to the public and make the computer code (source code) available as well. This means that anyone can download and use the software without cost, but individuals with the know-how can also use the code to customize the software or contribute to the project.

Typically, communities of users and developers arise to support open source projects. The size and composition of these communities can vary greatly.  Some projects are small while others, like Sakai, have large communities that include participation by major academic and commercial institutions.  The quality of open source offerings can also vary but many of these projects offer products that equal or exceed the capabilities and features of commercial counterparts.  For pedagogical use, open source may in some cases offer alternatives to commercial software but in other cases, a commercial product may be the better choice.

Questions to ask when evaluating "Open Source" for pedagogical and academic use:


1. Does the open source product offer features (or a useful feature subset) comparable to a commercial product?

2. Is the open source product sufficiently easy enough to use to be practical in a pedagogical setting?

3. Does the open source product offer features that are not available in a commercial product?

4. Does the student require expertise using a specific commercial product (that is not provided by an alternative product) in order to be viable in a professional job market?

5. Are the skills gained using the open source product transferable to other similar products both open source and commercial?

6. Can the open source product provide an alternative or supplemental tool for academic research?

A few examples of "Open Source" software that may have pedagogical value:

Art and Music

Audacity
Description: Audio recording and editing program
Info: http://en.wikipedia.org/wiki/Audacity_(audio_editor)

Blender 3D
Description: Powerful 3D modeling and animation package.  Also includes video editing and video compositing capabilities and can be also used to create interactive 3d applications such as games
Info: http://en.wikipedia.org/wiki/Blender_3D

GIMP (GNU Image Manipulation Program)
Description: Image retouching and editing tool.  Comparable to Adobe Photoshop
Info: http://en.wikipedia.org/wiki/GIMP

Inkscape
Description: Vector graphics program comparable to Adobe Illustrator
Info: http://en.wikipedia.org/wiki/Inkscape

Musescore
Description: Music notation, composition and scoring software.  Comparable to Finale and Sibelius
Info: http://en.wikipedia.org/wiki/Musescore

OpenShot (Linux only)
Description: Non-linear digital video editing
Info: http://en.wikipedia.org/wiki/Openshot

Scribus
Description: Desktop publishing program comparable to Adobe InDesign
Info: http://en.wikipedia.org/wiki/Scribus

Math and Science

R
Description: A statistical programming language (originally based on the commercial 'S' language) comparable to SAS and SPSS.  The Comprehensive R Archive Network (CRAN) is an extensive repository of over 5300 contributed statistical routines and utilities.
Info: http://en.wikipedia.org/wiki/R_(programming_language)

Sage
Description: Mathematical software suite comparable to Mathematica and Maple
Info: http://en.wikipedia.org/wiki/Sage_(mathematics_software)

Productivity

LibreOffice
Description: Open Source office application suite.  (Forked from the older OpenOffice suite and maintained by the original primary OpenOffice developers.)
Info: http://en.wikipedia.org/wiki/LibreOffice

Friday, October 5, 2012

Evaluating Student Engagement Using the Statistics Tool in Courses/Sakai

by Alan Regan

Creating Custom Reports with the Statistics Tool in Courses/Sakai


As a professor, have you ever wondered whether your students viewed the class syllabus you posted online? Or maybe you're curious if your students are using the materials you've shared with them in the Resources tool? The Statistics tool in your class site can help answer these questions.


Video tutorial: http://youtu.be/kvnt6Nk77-o

  1. Click Statistics in your left menu.
  2. Click Preferences in the gray tool bar.
  3. Select "All Tools" and then click "Update."
  4. Click Reports in the gray tool bar.
  5. Click Add to create a new, custom report.
  6. Click Show to reveal the Title and Description boxes. Enter a title so you can save your report.
  7. Select the type of report you want to generate.
    Visits - how many times participants have accessed your site.
    Events - the tools and activities with which your participants have interacted.
    Resources - the documents, web links, or other materials with which your participants have interacted.
  8. Select the time period, such as "Last 365 days."
  9. Select the participants to include:
    All - will include everyone
    Role - will allow you to select a user type, such as "Student," "Instructor," etc.
    Custom - will allow you to select one or more specific users. You can Control-Click (Windows) or Command-Click (Mac) to select more than one person.
  10. Select the report items to include in the report. Grayed out items are not available for the report type you selected.
  11. Click Save Report.
  12. Click the title of your custom report to view the results.
  13. At the right, click the Show drop down menu to view more rows of data on the same page, such as "Show 200." You can use the arrow buttons next to the Show menu to navigate through multiple pages, if necessary.

Example Reports

"All visits, all users, last 365 days"

Want to see if someone visited your site on the day when an assignment was due? This custom report will verify whether they accessed your site or not.
  • What: Visits
  • When: Last 365 days
  • Who: All
  • How: User, Event, Date

"All events, all users, last 365 days" 

Want to know if they ever viewed your syllabus, visited the Tests & Quizzes tool, or interacted with other tools? This is the report to create.
  • What: Events (Select by tool, All)
  • When: Last 365 days
  • Users: All
  • How: User, Tool, Event, Date

"All resources, all users, last 365 days"

Want to know what documents or web links they've accessed in Resources, Dropbox, etc.? Try this custom report.
  • What: Resources
  • When: Last 365 days
  • Users: All
  • How: User, Resource, Resource action, Date

We encourage you to experiment with the Statistics tool to help you review the engagement level of your students and which materials or tools are the most popular in your site.

Friday, September 28, 2012

Dropping the Lowest Grade in the Gradebook

By Landon Phillips

Gradebook In-Depth: Drop Lowest


A professor recently asked how to drop the lowest score out of a series of quizzes. The process is quite easy and we can accomplish this in the Gradebook tool.

  1. Go to the course.
  2. Click Gradebook in the left menu.
  3. Click Gradebook Setup in the gray toolbar.
  4. Under "Categories & Weighting," select either "Categories Only" or "Categories & Weighting."
  5. Enter the desired categories for your grades. To add more categories, click "Add a Category." In the example below, we've added five categories and numbered them so they display in a specific order.
  6. Select "Enable Drop Lowest."
  7. In the "Drop Lowest" column, enter the number of items you wish to drop automatically from the calculation (e.g. 1).
  8. Click Save Changes.

NOTE: Each Gradebook item in the category must have the same points possible. For example, the professor has 10 quizzes and they are all worth a maximum of 10 points each.


Friday, August 17, 2012

Flipping The Classroom

Transform Your Teaching by Flipping Your Classroom

by Hong Kha

During our faculty professional development program this summer, we encouraged faculty to consider a number of practices to enhance their face-to-face or blended classes. One of these practices is known as "flipping the classroom."

What does "Flipping the Classroom" mean? 


In a traditional classroom, a teacher stands in front of the class and lectures to the students. The majority of time, therefore, is spent in knowledge transfer. In a flipped classroom, the "lecture" material is delivered outside of the classroom. Students watch or listen to recorded lectures or self-paced learning modules at home, in the library, or anywhere with Internet access. This strategy frees up class time for more student-centered, instructor-guided learning activities.

Of course, this isn't a new concept. Educational theorists like Jerome Bruner wrote about discovery learning and constructivism decades ago. Today's learning technologies help professors deliver these educational opportunities and enable students to be more active in their own learning.

Learn more:


We encourage you to explore the following materials and decide for yourselves whether these practices can enhance your classes.

Wednesday, April 18, 2012

Turnitin Updated to Latest Release on Courses (powered by Sakai)

by Alan Regan

New Turnitin Integration Installed: Edit Your Existing Assignments!


On March 21, 2012, we successfully installed the latest and greatest integration of the Turnitin service to our Courses (powered by Sakai) learning management system. With this new integration, faculty will enjoy more options to customize their use of Turnitin with an assignment.

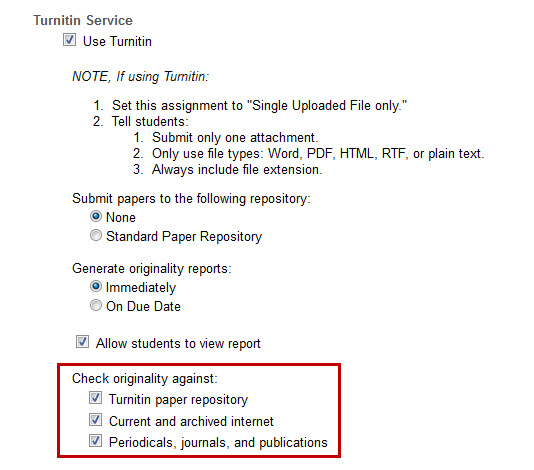
If you create a new assignment, you'll notice the single "Use Turnitin" checkbox. If you are not using Turnitin, all of the options will remain hidden.  This is nice, since it reduces the text on the screen.  If you choose to use Turnitin, then the options will appear. You'll see right away that you have more options available. By default, a new assignment will be pre-configured to not save papers to the repository ("None"), to generate originality reports "Immediately," to "Allow students to view (the) report," and to check against all three available sources.

If you have an existing, open assignment, it is very important that you check the settings. Be sure that you select the sources you want to check each paper against. If you do not select these options, you will see errors and students will not see originality reports.

We hope you enjoy the updated Turntitin integration and find this information helpful.

See Also:

Great Short Videos on Using Rich Media in Education

by Alan Regan

Rich Media: What is it? Check out this short video series!


Many of our faculty use media effectively in the classroom, whether they teach face-to-face or hybrid/blended classes. If you are exploring the benefits of using media in your classes, I recommend that you set aside a few minutes and watch this short, four-part series on rich media.

Steve Covello of Granite State College of Concord, New Hampshire reviews rich media in depth. He offers an expanded definition and covers both the theoretical and practical benefits of using rich media in instruction.
If you are an instructor, instructional designer, faculty support representative, or a training specialist, you'll appreciate taking the 20 minutes to watch all four videos.

See Also:

Friday, March 23, 2012

Workaround: How to copy content from Internet Explorer 9 into the "Source" of the rich text editor

by Alan Regan

How do I paste content into the "Source" of the rich text editor with Internet Explorer 9?


As new browsers keep coming out, they sometimes create problems with existing websites or web-based services. In Courses (powered by Sakai), Internet Explorer has a problem pasting content into the "Source" option of the rich text editor. It simply won't do it! However, there is a workaround.

Instructions:

  1. Open Internet Explorer 9
  2. Go to a site with embed code, such as YouTube.com or TED.com
  3. Copy the full or old embed code (the version that contains the OBJECT and EMBED tags, not IFRAME tags)
  4. Log into http://courses.pepperdine.edu
  5. Go to your course or project site
  6. Press F12 to turn on the developer tools interface in Internet Explorer
  7. Click Document Mode and switch from Internet Explorer 8 to Internet Explorer 9
  8. The page will refresh (you must be logged into Courses when you do this!)
  9. Use a tool with the rich text editor (e.g. create a new message in Forums)
  10. Click "Source" in the right text editor
  11. You can now paste the code into the "Source" field
  12. Click "Source" again and then scroll down to click "Post" or "Update"
NOTE: The F12 trick is not permanent.  You will need to repeat this the next time you log into Courses if you want to paste content into the "Source" feature of the rich text editor.

We hope this information helps!

Monday, March 5, 2012

How to embed a YouTube video on Courses/Sakai

By Alan Regan

How to Embed a YouTube Video in the Forums of Courses (powered by Sakai)


YouTube is a resource for both entertainment and education. The videos can contain helpful, controversial, and thought-provoking content. So, how do you post a YouTube video within the Forums tool of Courses/Sakai?

Instructions:


YouTube.com

  1. Visit http://www.youtube.com
  2. Find a video you want to share
  3. Click "Share" below the video
  4. Click "Embed"
  5. Check the box for "Use HTTPS"
  6. Check the box for "Use old embed code"
  7. Copy the code

    Forums tool of Courses (powered by Sakai)

    1. Log into http://courses.pepperdine.edu by clicking "Pepperdine Login" and entering your NetworkID and password
    2. Go to the course or project site by clicking the tab or clicking its name in the "All My Sites" tab
    3. Click Forums in the left menu
    4. Click the desired topic
    5. Click "Start a New Conversation" or reply to an existing message
    6. Enter the message you want to say
    7. Click "Source"
    8. Place your cursor where you want the video to display
    9. Paste the code
    10. Click "Source" again (very important!)
    11. Click "Post"
    NOTE: Embedded videos will be viewable by users with a PC or Mac laptop running the latest Adobe Flash Player add-on for your web browser. iPad and iPhone users may not see the video. We recommend that you embed and provide the link to the source video, too.

      Embed a Prezi presentation in a discussion Forum on Courses/Sakai

      By Alan Regan

      How to Embed a Prezi Presentation in the Forums Tool


      Prezi.com is a fun way to put a new spin on presentations -- literally. Through Prezi, you can zoom in, zoom out, spiral, and transition from idea to idea with ease. It's a great way to create a compelling or interactive presentation.

      There are several ways to share your Prezi with your peers on Courses (powered by Sakai):
      1. Link: You can create a simple link that viewers can click and see your presentation on the Prezi.com website.
      2. Download: You can download a portable version of the Prezi that you can share or take with you when giving a presentation on the road (great if the Internet access at a location is questionable!).
      3. Embed: You can grab code to embed the information on your website, blog, or in the Forums tool of Courses/Sakai.
      We will discuss how to embed your Prezi in the Forums tool of Courses.

      Instructions:


      Prezi.com

      1. Locate the presentation you want to share at http://prezi.com
      2. Click "Share" at the bottom right of the presentation
      3. Click "Embed"
      4. Click "Copy Code to Clipboard"

        Forums tool of Courses (powered by Sakai)

        1. Log into http://courses.pepperdine.edu by clicking "Pepperdine Login" and entering your NetworkID and password
        2. Go to the course or project site by clicking its tab or selecting it from "All My Sites"
        3. Click "Forums" in the left menu
        4. Click the topic where you want to post the presentation
        5. Click "Post New Thread" or reply to an existing message
        6. Write the text of your message
        7. Click "Source"
        8. Place your cursor where you want the presentation to display
        9. Paste the code
        10. Click "Source" again (very important!)
        11. Scroll down and click "Post Message"
          NOTE: The code may contain an unsupported tag called STYLE.  After you post the message, if you see this stray code, you can edit the message and remove just this code, leaving everything else.

          Tuesday, February 14, 2012

          Add a countdown timer to your site

          by Alan Regan

          Add a countdown timer to your class or project site


          A dissertation professor wanted to express the importance of planning ahead. On the home page of her class site, she wanted an obvious countdown timer -- something big, bold, and real-time. Something that would eliminate the possibility of: "Oh, I wasn't aware it was due so soon."

          There are many ways to accomplish this task. I will be using code created by Robert Hashemian from his site http://www.hashemian.com/  To help our Pepperdine faculty, I placed the source code within our Courses/Sakai service to reduce the possibility of service interruption.

          Example:  Open example countdown timer.


          Part One: Create your HTML page in Resources

          1. Go to Resources in your class or project site.
          2. Click Add and select Create HTML Page.
          3. Enter the text you want your students to see on your home page.
          4. Click Source at the top left of the rich text editor.
          5. Place your cursor in the text where you want to insert your timer.
          6. Copy the following code:

            <p>
            <font size="5">
            <script language="JavaScript">
            TargetDate = "04/20/2012 5:00 AM UTC-0800";
            BackColor = "paleturquoise";
            ForeColor = "navy";
            CountActive = true;
            CountStepper = -1;
            LeadingZero = true;
            DisplayFormat = "%%D%% Days, %%H%% Hours, %%M%% Minutes, %%S%% Seconds.";
            FinishMessage = "It is finally here!";
            </script><script language="JavaScript" src="https://courses.pepperdine.edu/access/content/user/alan.regan/public/countdown.js">
            </script>
            </font>
            </p>


          7. Paste the code.
          8. Modify the date and time to your desired countdown "TargetDate." (NOTE: UTC-0800 sets the format to US Pacific time.)
          9. Click Source again.
          10. Click Continue.
          11. Enter a Name for the page (e.g. Home Page).
          12. Click Finish.

          Part Two: Copy the link to your new HTML page

          1. Click Actions next to your new HTML page.
          2. Select Edit Details.
          3. Scroll down.
          4. Click Select URL (for copying) next to "Web address (URL)."
          5. Copy the highlighted text.

          Part Three: Modify your Home tool

          1. Click Home in your site's left menu.
          2. Click Options.
          3. Scroll to the bottom.
          4. Place your cursor in the box next to "Site Info URL."
          5. Paste the HTML page link in the "Site Info URL" box.
          6. Click Update Options.
          Your revised Home tool should now display your HTML page and your countdown timer.

          If you consider yourself pretty handy with HTML and want to modify the color scheme of the script, feel free. You can find color names at the following W3Schools.com site

          IMPORTANT: You cannot enter the above code directly onto your Home page's text editor. You must use the HTML page method for the code to render properly. If you follow the above steps, it will work correctly.

            Thursday, February 2, 2012

            Backspace Ate My Homework!

            By Alan Regan

            Disabling Backspace in Your Web Browser


            A professor was writing feedback on student assessments online. After entering a lot of comments, he accidentally clicked out of a text box and clicked the backspace key on his keyboard -- swoosh! Gone! Most major web browsers use the backspace key as a keyboard shortcut for the "back button" operation. So, he basically navigated away from the page to an earlier one, wiping out his hard work.  And the same problem could happen to students completing online surveys or exams.  What can you do?

            The goal here is to reserve the backspace key for editing text, not navigating back to an earlier web page. You can explore the following options to address this problem.

            Browser Options Resources
            Chrome third-party extension third-party link
            Firefox configuration official link, third-party link
            Internet Explorer none use Firefox (see above)
            Safari third-party extension? use Firefox (see above)

            What else can you do?

            You can always report this as a feature request to the appropriate company.

            Hat Tip: Thank you to Dr. Chris Heard of Seaver College's Religion Division for bringing this issue to our attention.

            IMPORTANT: Please use caution when installing any third-party web browser extensions. Third-party extensions are not supported by the university. Before you attempt to install any third-party extensions, research them thoroughly on the web and only download from reputable websites. Also, make sure that your virus and anti-spyware software are up-to-date.

            Tuesday, January 17, 2012

            To Publish or Not to Publish, That is the Question

            By Alan Regan

            Q: "Are class sites automatically unpublished at the end of an academic term?"
            A:  No.

            Since we've received a few questions about this recently, I thought I would post a quick note on this topic. The question is related to Courses (powered by Sakai), the university's official learning management system. At the beginning of each academic term, we automatically create course sites for all five schools. These sites are initially "unpublished." This means that faculty can see them, but students cannot. It allows professors the time to upload resources and configure the site before classes begin. When ready, professors "publish" their sites so that students can see and access them.

            At the end of the term, we do not "unpublish" sites automatically. We leave this at the discretion of our professors. Many professors encourage learning to continue even after a class has ended. Several graduate students have noted their appreciation for the fact that conversations in discussion forums, lecture materials, and other content are still accessible after a semester/trimester ends.

            Of course, if a majority of professors prefer that we automatically unpublish all class sites at the end of a term, we can easily do this. If you are a professor at Pepperdine University and feel that past class sites should be automatically unpublished, please let us know.

            Q: "Do you delete old class sites?"
            A:  No.


            With our previous learning management system, storage was very expensive. On our new service, Courses/Sakai, storage is not as expensive. Rather than routinely erase old classes, we decided to retain all past classes. This way, professors can refer back to older class materials and even copy materials into new class sites.

            At the end of each academic term, we strongly recommend that professors backup their class Gradebook or other grade data for safekeeping. This is a good practice and will serve as an additional backup in the event that a professor accidentally removes content on Courses/Sakai.

            See Also:

            Friday, January 6, 2012

            Checklist for a New Academic Term

            By Alan Regan

            Welcome back!


            As you get started with a new academic term, we want to remind you of the most common items professors do at the beginning of a new semester/trimester.

            Checklist for a New Academic Term:

            1. Access Courses (powered by Sakai).
            2. Publish your class site so that students can see and access it.
            3. Reorder your site tabs to access your classes quickly and easily.
            4. Add or remove tools to engage students in learning activities.
            5. Reorder your tools to focus student attention.
            6. Post your syllabus to inform students of learning objectives and requirements.
            7. Copy course materials from a previous semester to repurpose your hard work.
            8. Combine class rosters if you are teaching cross-listed classes or multiple sections of the same class but want to manage only one site.
            If you are new to Courses (powered by Sakai), need a refresher, or want to expand your knowledge, please sign up for a one-on-one consultation with our Technology and Learning team.  You may also contact your Seaver College technology liaison or graduate campus support representative for training and support.

            And if your students need some guidance, point them to http://bit.ly/coursesguide or TechCentral.

            We hope you find this information valuable!