Tuesday, August 18, 2015

The Web Content Tool in Courses (Powered by Sakai)


The Web Content Tool in Courses (Powered by Sakai)


By John Buckingham

A critical component of setting up a course site in Courses (Powered by Sakai) is directing students to the proper resources and tools they will need throughout the class. One such resource is an external website(s) like Adobe Connect where synchronous class sessions will be held. Enter the Web Content tool in Courses.

To add it, simply click on the Site Info tool in the desired course site.


There, select Edit Tools.


Scroll down and check the box next to the “Web Content” tool and then select Continue.


  At this point, you will be prompted to title this web content resource. In this example, I’ll title it “Adobe Connect.”


In the source field, I can supply the URL link to my Adobe Connect classroom. 


NOTE
To access this resource through a new browser tab, It is highly recommended to supply the link with the prefix “HTTP” (and NOT “HTTPS”). So if you copy and paste your Adobe Connect link, be sure to remove that S, as this will force Courses (Powered by Sakai) to open the Adobe Connect classroom in a new web browser tab. Don’t worry, connecting to Adobe Connect in this way is still secure.


 After you have supplied the correct URL, click Continue.


Then followed by Finish.


Now, you’ll have the new tool in the side toolbar titled appropriately.


And for the grand finale, when I click the Adobe Connect Web Content Tool, it opens up in a new browser tab, just as I wanted it to. Highlighted in red below is the Courses Tab, where I can click to return at any time.


See? That wasn’t so bad. Now you can add whatever external URL resources you wish to your course site and make sure that students can stay on Courses (Powered by Sakai) in their web browser.

If you have any questions, please don’t hesitate to contact us at Technology & Learning for a consultation!

Best,
John C. Buckingham III


Wednesday, July 8, 2015

Stay in Control of Student Expectations by Hiding Gradebook Items in your Gradebook


Stay in Control of Student Expectations by Hiding Gradebook Items in your Gradebook


By John Buckingham

The Gradebook tool is easily one of the most important tools in your course site side tool bar, as it keeps students in the know of their progress and performance in your class. Timely access to grades is not only critical to improving student performance, but it also plays a major role in student critiques in faculty evaluations. So what happens when students see ungraded Gradebook items? Does this set up an expectation for students to see grades on a time scale they envisage? Does it inspire a question in the student's mind that the instructor might be a procrastinator? We at Technology and Learning believe that it does.

Fortunately, Courses (Powered by Sakai) provides the ability to hide Gradebook items! This way, you can create the items ahead of time, grade the activity when the due date has elapsed, and then release the item and the corresponding scores to students. Making this process even simpler, Sakai Gradebook prompts you to make a decision on this point at the moment when you are creating each gradebook item.

To illustrate, I am going to show a Gradebook that includes weighting categories and one graded assignment, as seen below in the third image. At this point, I want to go ahead and add Gradebook items for the Final and Midterm respectively, but hide them from students. To that end, I’ll simply click on “Add Gradebook Item(s).”


After providing all of the data for the required fields, you’ll observe a “Release this item to Students” checkbox that has already been checked by default for you. Simply uncheck that box and remember to save your work by selecting “Add Item(s).”


Now, you’ll observe each of the items in their respective weighting categories with a grey color. This means that they’re invisible to students! You will be able to confirm this by going to the View Site As drop down box at the top right (as shown below) and viewing as a student.


Now you can rest assured that your Final and Midterm exam gradebook items cannot be seen by students.


Once you’re ready to reveal an item and its corresponding scores, simply click on the “Edit” button next to the gradebook item.


Then check the “Release this Item to Students” check box. Be sure to check the “Include this item in course grade calculations” if you’re letting Sakai keep track of grades. Don’t forget to “Save Changes!”


As you can see, the Midterm Item is now no longer grayed out and the scores are available to students for viewing.


Hiding Gradebook items can be the difference between setting up student expectations for disappointment and managing those expectations from the beginning. If you have any questions, please don’t contact us at Technology & Learning for a consultation!

Best,
John C. Buckingham III

John.C.Buckingham@pepperdine.edu


Monday, May 4, 2015

Stream Your Videos to Students Using Google Drive


Stream Your Videos to Students Using Google Drive


By John Buckingham

A few professors have approached the technology and learning department asking about their options for sharing rich, engaging media with students in the context of their courses. A lot of this media, especially videos, can be difficult to share, given the large sizes of these files and the constraints of available space and size limitations when uploading those files to Courses (powered by Sakai). Making matters even more difficult is the fact that a lot of faculty want to regularly reuse and share this content with students on a consistent, class-by-class basis.

Enter Google Drive powered by Pepperdine’s Google Apps platform. This platform can easily stage all of your media needs, with a whopping unlimited storage space available for your account. You can upload and store any file here and then gather a link to share that content with students. Even more impressive is the fact that uploaded videos can be streamed by the click of a button. This offers the enormous advantage of saving students from needing to download the video file for viewing. Gone are the days of worrying about large file sizes and the size constraints when uploading rich media!

If you have not yet explored and signed up for Google Drive, then visit google.pepperdine.edu to get started. It’s a quick sign up process that’ll unlock all of this potential for your classroom!

To upload a movie file to Google Drive, log in to Google Apps, and make sure that you’re in the Google Drive area. If you are not, you can click on the rubik’s cube icon to access the Drive.


Once you are in Google Drive, click the red "New" button (Step 1) on the top left, and then select "File Upload" (Step 2).


At this point, you will be prompted to locate the video file you wish to upload.
After the file has been uploaded, you’ll want to share it! To share this with students, right click on the file and select “Share."


When the pop up opens, select “Advanced.”


And then select “Change …” under “Who has Access.”


Make sure to select the option of “Anyone with the link.” Then click “Save.”


Now, simply gather the link in the resulting page under “Link to Share.” This is the link which you can distribute to students.


Caution: Before distributing the link to students, be sure to test the link yourself. This can be done by first logging out of your account and then pasting the link into the browser URL. These videos must be processed in Google Drive before they are ready to stream. So while testing, if you encounter the error “This video is currently unavailable,” that means that the video is still being processed and must be completed prior to distributing the link.

Once you have tested the link yourself and it works to your satisfaction, let the distribution commence! You can copy and paste the link to an email, an announcement in Courses (Powered by Sakai), or even add a Site URL link within the Sakai site Resources folder.

If you have any questions about the process outlined above or seek advice on the best methods for distributing video links to students, please contact us at Technology & Learning for a consultation!

Best,
John C. Buckingham III

John.C.Buckingham@pepperdine.edu


Monday, March 16, 2015

Email Archive Tool as an Alternative Mechanism for Announcements in Sakai

Email Archive Tool as an Alternative Mechanism for Announcements in Sakai


By John C. Buckingham

Not too long ago, a Pepperdine University professor came to the Technology and Learning group with a unique request: She wanted the ability to forward announcements from one course to another course. That is, she wanted to post announcements to Sakai Site A which would email Members A and then forward to Site B which would email Members B. But Could the Announcements Tool accomplish this task?


The Announcements Tool is a fantastic valuable “out-of-the-box” tool for updating and reminding students of important upcoming events, assignments, tests and the like. While it’s possible to merge announcements from Site A to Site B, this method does not automatically generate emails to members of Site B after the merge.

So what’s the alternative? Enter the little-known Email Archive Tool. This tool allows you to keep a record of all class communication and centrally store it on your course site. But more than that, however, is the utility of managing a single email address for the entire class (1). This email address can be customized to suit your course site. In effect, this serves as an alternative method to the Announcements Tool. As you can see, the first email I sent to the course can be seen below (2). Simply click on the subject to view the contents of the message.


In addition, you can also change the name of the Email Archive Tool and call it “Announcements” instead. This will intuitively guide students to check this tool for new announcements.

To return to the above scenario, we guided the professor into implementing the email archive tool on both Site A and Site B. To send an announcement, the professor need only email both sites with the same email.  Not only would the email be stored on the Site archive, but also the members would each receive a copy by way of email!


The Email Archive Tool is an excellent tool to accomplish the above purpose, but it can also just be a great method for storing important messages on the Sakai course site. If you have any questions for how to leverage this tool even further, don’t hesitate to contact us at the Technology and Learning group for a consultation!

Wednesday, March 4, 2015

Build Upon your Creative Literacy by Enhancing your Visual Literacy

Build Upon your Creative Literacy by Enhancing your Visual Literacy


By John C. Buckingham

Here is a question that might make you scratch your head: what is creative literacy? Perhaps you have never even seen these two terms together or pondered what could be “creative” about literacy? But the question is a note worthy one as it relates to academia in particular!

Let’s put the question in different terms. What is one form of literacy that empowers or channels your creative side? And in the context of this space here, how can you leverage that literacy to enhance the learning environment for your students?

I’m going to suggest one form of literacy that is absolutely critical to engagement and learning: visual literacy. In short, visual literacy refers to the ability to find, interpret, evaluate, use and produce images. As a current graduate student at California State University Long Beach, one of the biggest challenges I’ve observed that we all struggle with is the ability to produce and present rich visual images conducive to the course material.

Given that we live in a digital world with the advent of the Internet, learners are interacting with images on a completely different scale.* We students expect images as a learning tool because it’s becoming one of the most important ways that we communicate with each other. One look at networking sites like Facebook or Reddit will immediately illustrate that fact.

So, how can you enhance your creative literacy through the channel of visual literacy? A digital tool like Adobe Photoshop will empower you to create and utilize images in a way that promotes meaningful and effective interactions. It’s true that this tool has a learning curve, but the outcomes will be well worth the effort. Making your own images also has the advantage of avoiding copyright challenges.

If, however, you are short on time, try photographing some images in relation to your subject materials for a lively discussion. Using more simplified tools like Microsoft Paint, Snagit or even xMind can give your images the edge that simple, boring text cannot. As students, we want to see your creative side show itself through visual aids.


If you use Adobe Connect for online classes, there are a number of creative, “out-of-the-box” pods that can engage students on a visual level. One pod you can visually stimulate them with is the Word Cloud Pod. This pod provides a pictorial representation of words that would otherwise be perceived as dull data. The visual dimensions of this activity are the different fonts, sizes, layouts and color schemes that convey the prominence level of keywords pertinent to the subject material.


Hopefully some of these suggestions can invoke some useful cognition for channeling your creative energies and inspire you to augment your visual literacy. And as always, if you’d like an additional outlet with which to express your creative ideas, feel free consult with us at the Technology & Learning group!


Best,

John C. Buckingham

* Hattwig, Denise, Kaila Bussert, Ann Medaille, and Joanna Burgess. “Visual Literacy Standards in Higher Education: New Opportunities for Libraries and Student Learning.” Portal: Libraries and the Academy 14, no. 1 (2013): 61-89. 


Monday, February 16, 2015

Increasing Engagement of Group Interaction in the Virtual World


By John C. Buckingham III

Group work in the classroom has for a long time been recognized as an effective learning strategy by professors in higher education. The interactive nature of group work prompts students to share ideas, solve problems, elucidate differences, craft new knowledge from multiple perspectives and experiences, and achieve deliverables as a team. But recent research has shown that, though students do enjoy and reap many benefits from group work, the negative aspects of personality conflicts, poorly thought out group composition and sizes, “free-riders,” and the lack of clearly structured tasks and goals often diminish the positive gains for students to some degree*

Another recent study on part-time MBA students confirmed much of the observations above, and though there is no one-size-fits-all strategy for implementing group work across all disciplines, the study did offer a number of important considerations for professors to facilitate valuable, group-work experiences in the classroom. Among them are:
  • Reflect carefully on the strategy and aims of the group work you plan to implement
  • Form “cross-functional” groups of students from different backgrounds to promote interaction and ideation from multiple perspectives
  • Place students in groups earlier on in the term to promote prolonged interaction
  • Clearly define the objectives and tasks for students to complete during the group work
  • Facilitate group work by ensuring that students stay on task and have the adequate resources to accomplish the stated objectives**

Given the challenges that students report on face-to-face group work, it becomes ever more important to reflect on and implement the best practices of group work in the online learning world. Fortunately, Adobe Connect is prepared to face that challenge with Breakout Rooms. These virtual breakout rooms can facilitate a robust group work experience that can easily parallel its face-to-face correlate.

Creating Breakout Rooms

Before creating and designing the breakout rooms in Adobe Connect, think about the goals and aims you have for your class. Come up with clear and concise tasks for students to complete while in their breakout rooms. It is critical that you take some time to design your breakout rooms before your class begins.

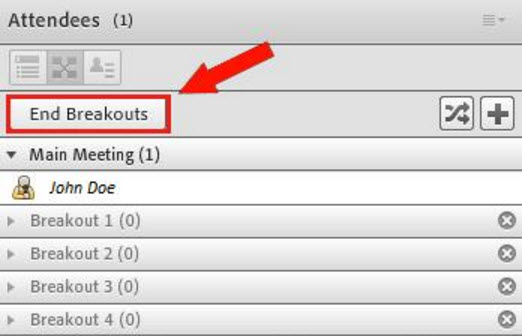
To begin, open your Adobe Connect classroom and click the Breakout Room View in the Attendees Pod (Step 1). This will reveal all of the Breakout Rooms created by default for your classroom. To add additional Breakout Rooms, click the + button (Step 2). Afterwards, click on Start Breakouts (Step 3) so that you can design the rooms.

It is important to understand that Breakout Rooms in Adobe Connect are virtual walls, which can be lifted and lowered at any time. In this way, you can End Breakouts quite easily and even Start them once again to return. Starting Breakouts again returns you to the same rooms you had before, with nothing lost. Try it!

Designing the Breakout Rooms

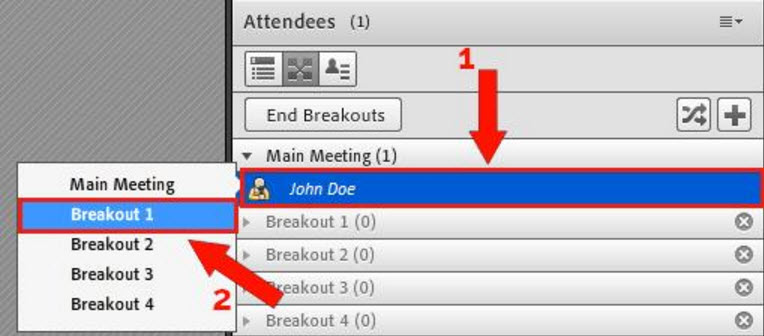
Note: If you followed along above and ended the breakout rooms, you must Start Breakouts again to design each room.

To go to a desired breakout room, click on your name in the Attendees Pod and then select the Breakout Room you’d like to go design first.

For each breakout room, make sure to include a Share Pod that includes content which specifically outlines the group work to be completed. In addition, include a Notes Pod and a Chat Pod for student note taking and participation. The Note Pods can be re-surfaced later for discussion with the entire class.

Once each of the breakout rooms have been designed, you are ready for your class. While you are assigning students to breakout rooms, be sure to designate a student note taker for each group who can track the progress of the work.

While breakout rooms are in progress, it is highly recommended that you visit each breakout room to facilitate the group work process. Students may have questions about the tasks or the material.

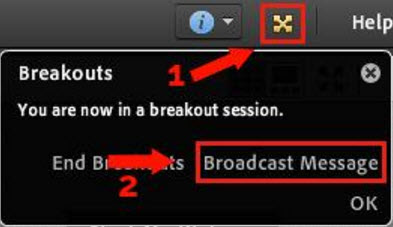
When breakout rooms are about 5 minutes from ending, Broadcast a Message to all breakout rooms that they should wrap up their work. Once 5 minutes have elapsed, you can End Breakouts and resume a normal class discussion.

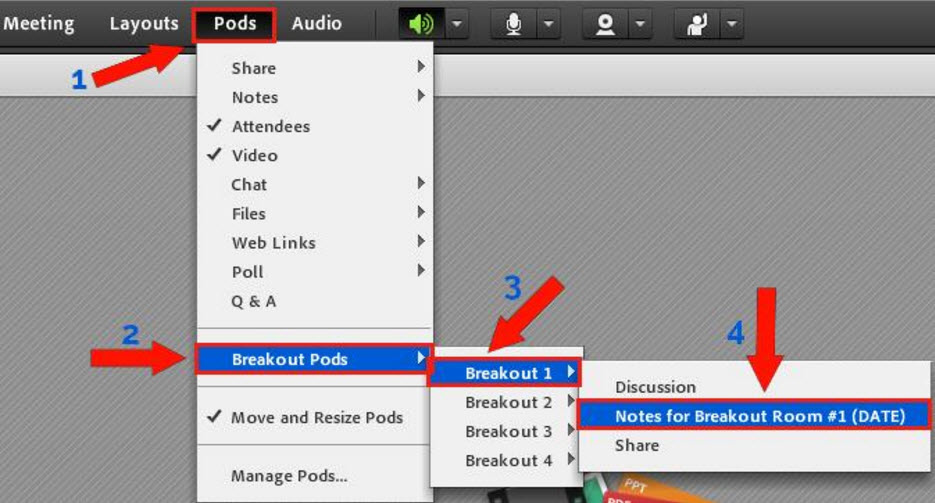
Finally, sharing the outcome of the group work with the entire class is easy! Simply click on Pods, scroll down to Breakout Pods, select a desired breakout room, and then the pod which you’d like to share with the class.


Breakout Rooms in Adobe Connect constitute a robust tool for online group work. Practice these steps on your own to achieve a smooth flow in a live class! And as always, if you have additional questions, you can always contact us at the Technology & Learning Group for a consultation on how to leverage even more utility from Breakout Rooms.


References


* Eva Hammar Chiriac, “Group Work as an Incentive for Learning – Students’ experiences of Group Work,” Frontiers in Psychology 5, (2014): 3, accessed January 27, 2015, http://www.frontiersin.org/Journal/Abstract.aspx?s=346&name=educational_psychology&ART_DOI=10.3389/fpsyg.2014.00558.

** Patricia D. Rafferty, “Group Work in the MBA Classroom: Improving Pedagogical Practice and Maximizing Positive Outcomes With Part-Time MBA Students,” Journal of Management Education 37, (2013): 635-644, accessed January 26, 2015, http://jme.sagepub.com/content/37/5/623.full.pdf+html.