Showing posts with label powerpoint. Show all posts

Monday, August 18, 2014

Adobe Connect: What Fonts Are Supported in PowerPoint Uploads?

Adobe Connect and PowerPoint: The Fonts that Work (and other options)

by Alan Regan

Adobe Connect is a powerful tool for online teaching and collaboration. A great feature is the ability  to import content such as PowerPoint presentations, PDFs, or MP4 videos. Professors commonly import PowerPoint files, but sometimes the conversion looks different than what normally appears on their computers. The most common reason is that a font in the PowerPoint is not supported by the Adobe Connect service.

So what's a professor to do?

There are five options to explore:
  1. Use fonts in your PowerPoint that Adobe Connect supports
  2. Save your PowerPoint as a PDF and upload the PDF
  3. Save your PowerPoint slides as JPEG images to add to a new PowerPoint
  4. Save your PowerPoint as a video (MP4)
  5. Embed your fonts in your PowerPoint

Fonts that Adobe Connect Supports

One of the easiest approaches is to focus your presentation design on core fonts that Adobe Connect supports. Adobe reports that Adobe Connect's hosted service runs on Windows servers and supports the fonts that are standard on those systems. The short list to help professors and instructional designers is:
  • Arial
  • Calibri
  • Cambria
  • Candara
  • Comic Sans
  • Courier New
  • Georgia
  • Impact
  • Lucida Console
  • Lucida Sans
  • Palatino Linotype
  • Symbol
  • Tahoma
  • Times New Roman
  • Trebuchet MS
  • Verdana
  • Webdings
  • Wingdings
If you choose this approach, be sure to limit your use to these fonts. Please be aware, there are often derivative fonts that have similar names. For example, there is a font called "Arial Narrow." These derivative fonts are not supported. Similarly, there may be similar font confusion on the Mac, such as Times vs. Times New Roman. Mac users should select the font names that match the list above.  Many of these fonts are provided when a recent version of Microsoft Office for Mac is installed.

For the full list of supported fonts, please visit Microsoft's website.

Save Your PowerPoint as a PDF

Adobe supports PDF documents in the "Share" pod, so another option is to save your PowerPoint presentation as a PDF. When you save a PowerPoint as a PDF, each slide will be a static "page" in your PDF.

Design Considerations:

  • Animations and transitions will be lost
  • Layer multiple bullet point reveals onto separate slides (if you want to focus attention one bullet point at a time)
  • Layer multiple image reveals onto separate slides (if you want to reveal each element one point at a time)
  • Embedded video and audio is not supported (you'd upload the video or audio file and share those elements separately)

PowerPoint Instructions:

The following steps are from Office 2013 for Windows. See the links below for other versions of Office.
  • Once your PowerPoint is ready and designed to flatten to individual pages in a PDF...
  • File > Save As
  • Choose the location on your computer and name the file accordingly.
  • From the "File Type" drop down, select "PDF" (if you have Adobe Acrobat Pro installed, you may be able to select File > Save as PDF directly)
  • Click "Save."
Preview the PDF to verify that each page appears as you desire.  You can then upload this file to your Content area in Adobe Connect or via the Share pod in an Adobe Connect meeting.

See also: PowerPoint 2010 for Windows, PowerPoint 2013 for Windows, PowerPoint 2011 for Mac.

Save Your PowerPoint as JPEG Images

Similar to saving your PowerPoint as a PDF, you can also save your PowerPoint as individual JPEG images.  Each slide is saved as a single JPEG image and you can then create a new PowerPoint file and insert each image onto separate slides. This involves more time than the PDF method, obviously.

Design Considerations:

  • Please refer to the previous design considerations in saving as a PDF.

PowerPoint Instructions:

The following steps are from Office 2013 for Windows. See the links below for other versions of Office.
  • Once your PowerPoint is ready and designed to flatten to individual images...
  • File > Save As
  • Choose the location on your computer where you want to save the files.
  • From the "File Type" drop down, select "JPEG File Interchange Format (.jpg)."
  • Rename the file if desired, else click "Save."
  • When prompted, select "All Slides."
  • When prompted that it will create a new folder, click "OK."
  • PowerPoint will create a new folder with the same title of your original PowerPoint file in the location you selected. Each slide will be an individual JPEG image.
  • You may now create a new, blank PowerPoint and insert each image on new slides. You may need to remove the placeholder textbox on each slide for the image to automatically autofit to the full slide.
See also: PowerPoint 2010 for Windows, PowerPoint 2013 for Windows, PowerPoint 2011 for Mac.

Save Your PowerPoint as a Video (MP4)

This is a hidden gem in modern versions of Microsoft PowerPoint -- many people don't know that this option even exists! If you want to preserve the full experience of your presentation (animations, transitions, etc.), this may be an option to explore. It does require some design setup, such as declaring the transition time (advance slide "after" time) for each slide. To help with this, you can use the "Rehearse Timings" feature to help set these numbers for you.

Design Considerations:

PowerPoint Instructions:

The following steps are from Office 2013 for Windows. See the links below for other versions of Office.
  • Once your PowerPoint is ready, you've set your slide timings, etc....
  • File > Save As
  • Choose the location on your computer where you want to save the file.
  • From the "Save as Type" drop-down, select "MPEG-4 video (.mp4)."
  • Rename the file if desired.
  • Click "Save."
  • Be patient and don't close PowerPoint! Your presentation will now be converted and saved into a video file. The larger and more complex your presentation, the longer it will take to convert.
See also: "Turn your presentation into a video (PowerPoint 2010 Windows)," "Save your presentation as a video (PowerPoint 2013 Windows)," "Save presentation as movie file (PowerPoint 2011 Mac)."

Embed Your Fonts in Your PowerPoint

Full Disclosure: This is only an option for Windows PowerPoint (not Mac PowerPoint). Also, results may vary. We list this option since Adobe has mentioned it as a potential solution, but we caution you that we've had mixed results.

This option involves embedding your custom fonts into your PowerPoint when you save the file. While Microsoft Office allows you to embed both TrueType and OpenType fonts, it seems as if Adobe Connect will only support TrueType fonts. Also, since you're including the font within the PowerPoint file, it will also increase the size of your resulting PowerPoint file, too.

PowerPoint Instructions:

Remember, this option is only available for Windows versions of PowerPoint.
  • Once your PowerPoint is ready...
  • File > Save As
  • Choose the location on your computer where you want to save the file.
  • Name or rename the file.
  • From the "Tools" drop down near the bottom, select "Save options."
  • Scroll down and select "Embed fonts in the file" and the desired option (e.g. "Embed only the characters used in the presentation (best for reducing the file size)").
  • Click "Ok."
  • Click "Save."

See also: "How PowerPoint font embedding and replacement can save your presentation (PowerPoint 2007, 2010, 2013)"


We hope the above options will help you deliver powerful, effective, and professional presentations in Adobe Connect.


Tuesday, August 5, 2014

Windows 8 Shortcuts for Presenters

When you Forget Your Laptop Function-Key Combo:

Windows-P to the Rescue for Presenters

by Alan Regan

Anyone who trains professors with classroom technology has a few key items on a checklist:
  1. Do you have the correct display port, adapter, or cable to connect to the room projector?
  2. Do you have a backup copy of your presentation file (hard drive, flash drive, and cloud storage)?
  3. Do you know how to send your display content to the projector?
For #3, it's critical that a professor can confidently send the presentation to the classroom projector or display. While many modern laptops will auto-detect and enable the display capabilities once an external display is connected, this isn't always the case.  For Windows-based machines, it gets a little more complicated since since almost every manufacturer has a different set of Function (Fn) key combinations to switch on/off the presentation mode of a laptop.  For example, most Dell laptops use the keyboard combo Fn-F8 while many HP laptops may use Fn-F4.

Thankfully, there is an even easier and consistent way to push the presentation display to a projector in Windows:

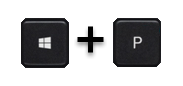
Windows-P

"Windows" stands for the Windows key, often with the Windows logo on the keyboard.  The "P" stands for "Presentation Mode." Pressing and holding the Windows key and then tapping the "P" key will display the available options: "PC Screen Only," "Duplicate," "Extend," or "Second Screen Only."  Professors will commonly select "Duplicate" to mirror the display on their laptop to the projector or display, or "Extend" to keep their laptop content private and move selected windows to the second display. The "Windows-P" shortcut is available in Windows 7 and Windows 8.
  • "PC Screen Only" - means that the computer content will only appear on the main display, commonly the built-in display of the laptop or a connected monitor on a desktop. No information is sent to the secondary projector or monitor.
  • "Duplicate" - means that the computer content will be mirrored (appear identical) on both the main display and the external display/projector.
  • "Extend" - means that the "extended desktop" feature will be enabled. The main or laptop display will have the primary operating system interface while the external display/projector will act like extra screen space. Professors would drag an application window over to the secondary display to show to attendees. This can be helpful if the professor wants to preserve some information for his/her "eyes only" and selectively move content to the projector for attendees to view.  Advanced presenters can switch which display is the "primary" and which is the extended secondary display through the "Display" Control Panel.
  • "Second Screen Only" - means that the display signal will only be sent to the external display/projector and the main or built-in laptop display will go dark. This can be helpful is a laptop's video capabilities are poor and can only support one display at a time.

Alt-Tab


Another tip for presenters is smoothly moving from one application to another. For example, moving from a PowerPoint presentation to a web page.  Rather than exiting PowerPoint and fumbling through application windows, try quickly toggling to your destination with the keyboard combination: "Alt-Tab." Press and hold the "Alt" key on your keyboard and tap the "Tab" key. Keep holding the "Alt" key and either tap the "Tab" key to move forward, "Shift-Tab" to move back, or simply use the arrow keys to navigate the available windows. Once the desired window is highlighted, release the "Alt" key to switch to that window in a snap!

Other helpful presenter shortcuts

  • Use Presenter View. In PowerPoint, use "Presenter View" to display the slide show on the projector but have presenter details (timer, notes, slide selection) on the laptop or primary display. In the Slideshow ribbon, make sure "Use Presenter View" is selected.
  • Quickly "B"lack the screen. In PowerPoint, press the "B" key during a presentation to "B"lack the screen temporarily. The period key (".") will also accomplish the same effect. This is very helpful to focus attention to the presenter rather than the screen. Press the "B" or "." key again to return to the current slide.  (If you prefer a white screen, press "W" to "White" the screen. The comma (",") is the equivalent.)
  • Start your presentation in a jiff.  In PowerPoint, press "F5" to start a presentation from the beginning or first slide.  Press "Shift-F5" to start from the currently selected slide.
  • End your presentation like a pro. In PowerPoint press the "ESC"ape key.
  • Move through slides with ease. In PowerPoint, there are many ways to navigate your presentation.
    • Next slide: Left mouse click, Space, Enter, Right Arrow, Down Arrow, Page Down, and "N" key will all advance to the "n"ext slide or animation.
    • Previous slide: Right mouse click, Backspace, Left Arrow, Up Arrow, Page Up, and "P" will all move back to the "p"revious slide or animation.
    • Jump to slide via slide number. Press the number for the slide and then press Enter. For example "3-Enter" will jump to the third slide.
    • Jump to slide via thumbnail (Office 2013). Press the hyphen ("-") key and then use arrow keys to select a slide. Press Enter to display that slide. NOTE: Pressing hyphen again will shrink the thumbnails, pressing equal ("=") will increase the thumbnails.
    • Jump back to first slide (Office 2010 and 2013). Press and hold the left and right mouse buttons for two seconds. NOTE: Your experience may vary with this tip. On my laptop, an external USB mouse worked and the pointing stick buttons worked, but the buttons on my trackpad did not produce the desired effect. You could always press the number "1" and press Enter for a quick jump to the beginning, too.

Learn More:


Friday, April 26, 2013

PowerPoint Vs. Prezi

PowerPoint Vs. Prezi

by Landon Phillips

Prezi and Powerpoint both offer excellent solutions to your presentation needs. This video will explain the differences between them, so that you may choose the right tool to meet your goals.


Video link: https://www.youtube.com/watch?v=UoJNShAQAnE


Additional Links
Prezi.com