Showing posts with label courses. Show all posts

Monday, March 16, 2015

Email Archive Tool as an Alternative Mechanism for Announcements in Sakai

Email Archive Tool as an Alternative Mechanism for Announcements in Sakai


By John C. Buckingham

Not too long ago, a Pepperdine University professor came to the Technology and Learning group with a unique request: She wanted the ability to forward announcements from one course to another course. That is, she wanted to post announcements to Sakai Site A which would email Members A and then forward to Site B which would email Members B. But Could the Announcements Tool accomplish this task?


The Announcements Tool is a fantastic valuable “out-of-the-box” tool for updating and reminding students of important upcoming events, assignments, tests and the like. While it’s possible to merge announcements from Site A to Site B, this method does not automatically generate emails to members of Site B after the merge.

So what’s the alternative? Enter the little-known Email Archive Tool. This tool allows you to keep a record of all class communication and centrally store it on your course site. But more than that, however, is the utility of managing a single email address for the entire class (1). This email address can be customized to suit your course site. In effect, this serves as an alternative method to the Announcements Tool. As you can see, the first email I sent to the course can be seen below (2). Simply click on the subject to view the contents of the message.


In addition, you can also change the name of the Email Archive Tool and call it “Announcements” instead. This will intuitively guide students to check this tool for new announcements.

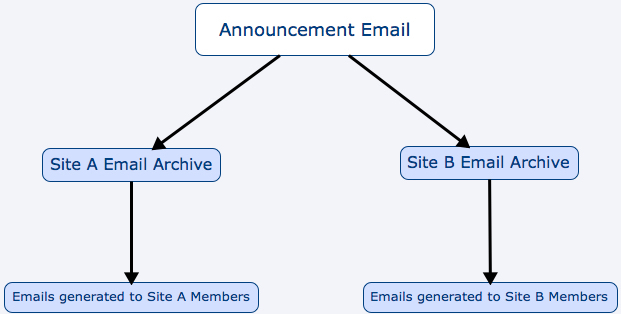
To return to the above scenario, we guided the professor into implementing the email archive tool on both Site A and Site B. To send an announcement, the professor need only email both sites with the same email.  Not only would the email be stored on the Site archive, but also the members would each receive a copy by way of email!


The Email Archive Tool is an excellent tool to accomplish the above purpose, but it can also just be a great method for storing important messages on the Sakai course site. If you have any questions for how to leverage this tool even further, don’t hesitate to contact us at the Technology and Learning group for a consultation!

Sunday, August 17, 2014

Simple Code Hack to Avoid Media Overlap

A Smidgen of Responsive Design for Faculty

by Alan Regan

Has this ever happened to you? You've embedded media in a blog, web page, or learning management system that has a right column, and your media overlaps the site's right column?


The reason? Your media is wider than the space available. Some web pages will adjust and push the right column, others will overlap like the above image shows.

In the event that you have access to modify the HTML code with your embedded media, a simple coding hack may be able to help. With one "style" addition, you can ask the page to please not display the media (image, video, etc.) beyond the limits of its content column or container.

The Code To Add: style="max-width: 100%;"


Here is an example using YouTube iframe embed code.

BEFORE

<iframe width="560" height="315" src="//www.youtube.com/embed/zpGcjQHPpTc" frameborder="0" allowfullscreen=""></iframe>

AFTER

<iframe width="560" height="315" src="//www.youtube.com/embed/zpGcjQHPpTc" frameborder="0" allowfullscreen="" style="max-width: 100%;" ></iframe>


Give it a try! I hope this will help your media stay within the bounds of your blog post, column, or frame. Works great in Sakai! If only we could convince YouTube and other media sites to add this simple code to the embed process by default...

Resources for the Tech-Curious:


Monday, March 31, 2014

MyLibrary - Library Resources at your Fingertips

MyLibrary Helps Students Find Library Resources

by Alan Regan

In almost every course site is a little tool called MyLibrary. If a student clicks this tool, it will present information tailored to their subject area or even their specific class and section.


How the Tool Works

When a student or professor clicks the tool, it looks at the course site. If it finds a specific match for that class site, section, and semester (e.g. ENG 101.01 F16), then it displays custom information for that class.  If it doesn't find an exact match, then it looks for the subject area (e.g. ENG), and displays the general information for that subject. Finally, if it finds no matches at all, then it displays a list of all general resource lists and the main library information.

The tool can also support up to two subject librarians per course.  For example, if the primary subject librarian is at the Malibu campus, and there is an additional subject expert at the Irvine campus, then a student can click the link at the bottom to display the other librarian's contact information.

Background

MyLibrary was a collaborative effort between Pepperdine IT and Pepperdine Libraries and has evolved over the years.  It began in 2007 when the library approached us about students not knowing where to go or who to speak with regarding research for class papers and projects. Working with library staff members, we mocked up some options and developed an initial tool for our previous learning management system (LMS). This version was originally created with Java, Flash, and Actionscript, which were popular at the time.

In 2009, we started our pilot of Sakai as a replacement for our previous LMS. We ported our prior version of the tool to a Sakai-friendly version. This version was also based in Java, Flash, and Actionscript. Slowly, we started to see more and more mobile devices appear on campus, and many devices were not compatible with Flash content. In 2012, we began a revision, and starting spring 2013 we launched the revised MyLibrary in HTML5/Javascript so that iPad and iPhone users could benefit from the tool.

****

We're very grateful for our collaboration with Pepperdine Libraries and hope that students and professors alike benefit from library resources and contact details readily available from their class sites.

Wednesday, February 12, 2014

Ice Breaker: Image Scavenger Hunt

Breaking the Ice

Find an Image that Represents Your View on the Subject

by Alan Regan

There are many ways to "break the ice" in an online or blended class, or even weeks before a face-to-face class begins. As they say, a picture says a thousand words. Why not combine both?

This is an example I created for the Social Entrepreneurship and Change program at GSEP.

ACTIVITY DETAILS

  • Introduce yourself and then briefly explain your understanding and vision for social justice philanthropy by searching for an image that you feel represents this for you.
  • Through this exercise, you will connect with one another, become comfortable with using the discussion forum tool, and have fun!

ACTIVITY INSTRUCTIONS

  1. Visit http://www.flickr.com/creativecommons/ 
  2. Search the creative commons repository for an image that represents your viewpoint on social justice philanthropy. Spend no more than five (5) minutes.
  3. Get the web address for the image and add it to your post.
  4. Write 1-3 sentences explaining how this image represents your viewpoint.
  5. Be sure to cite the image author by linking to the Flickr web address for the picture.
  6. Post your answer!

 TECHNICAL HOW-TO STEPS:

On Flickr
  • Visit http://www.flickr.com/creativecommons/
  • Click "See More" below the "Attribution License" section.
  • Search for your image. Short, simple terms are best.
  • Click the desired search result. 
  • On the right, scroll down. Click the "More Actions" button and then select "Download / All Sizes."
  • Click "Medium" (in most cases -- about 500 pixels wide)
  • Right-click and select "Copy Image Location" (or equivalent to copy the web address to the image)
  • Don't close the web page! You'll need the photographer's name for your citation!
On Courses/Sakai
  • Click "Start a new conversation" in the top tool bar.
  • In the text editor, click the "Image" button in the toolbar (second row, toward the right between the flag and the red "F" circle).
  • Paste the web address to the image in the URL field.
  • Click "OK."
  • Enter your reason for selecting this image. How does it represent your viewpoint on social justice philanthropy? Limit your response to 1-3 sentences.
  • Click "Post."
  • Done!

Resources:


Wednesday, October 23, 2013

How Pepperdine has Contributed to the Open-Source Sakai CLE

Even Small Institutions Can Make a Big Impact

by Alan Regan

This week, we applied a small patch to Courses (powered by Sakai). Courses is our learning management system at Pepperdine University, and the patch related to the "Home" tool within Sakai.  The Home tool is often the home page for a class or project site, which provides space for introductory information as well as a dashboard of announcements, calendar events, and similar notices.

We had discovered a peculiar issue with the Home tool.  If you edited the "Site Information Display" element and added embed code from YouTube (with iframe tags), the tool was stripping away the code.  It was peculiar, since this code is accepted in other tools like Syllabus, Lessons, and Forums.  It was even more bizarre, since a professor could go to Site Info and use Edit Site Information to add the same code -- and it would work! So, there was something unique about how the rich text editor in the Home tool was processing the code.

Our Sakai service is hosted by Longsight. We reported this situation to them.  They confirmed the issue, created a JIRA ticket (the bug tracking system used within the Sakai community), and promptly rolled up their sleeves and set to work. Shortly, they had a fix for the issue. We applied the fix to our development instance, did some testing, and then scheduled the release to production.  The patch is working, and professors can now use the default embed code from YouTube to bring their class sites to life. Better yet, the fix is available for any other institutions using Sakai, too.


This is something I love. I love the fact that, although we didn't create the fix directly, we played a part. By shining the light on an issue, reporting the problem, and testing the fix, we helped to make an open-source product just a little bit better. We've been able to contribute in this way a few times, either through sponsoring bug fixes or engaging in development projects which were then contributed back to the community.
  • Sakai 2.9's "Publish Now" feature was a feature we dreamed up based on feedback from our Pepperdine faculty members.  We contracted with Longsight to develop a solution and then worked with the Sakai CLE team to introduce it as a core enhancement in Sakai 2.9. Hat tip: Nicola Monat-Jacobs and Dr. Charles "Chuck" Severance.
  • Sakai's "Assignments" tool now offers the ability for professors to submit a document on behalf of a student. We were very excited for this feature, but soon discovered that it worked in two submission modes ("Attachments and Inline" and "Inline Only") but did not work in "Attachments Only" or "Single Uploaded File Only." We wanted to offer this feature to our professors, so we contracted with Longsight to make the feature available in all of these submission types. We also identified a display issue and worked with Longsight to fix this as well.
  • With the advent of more mixed content blocking in web browsers, we noted that Lessons would sometimes not display YouTube content. We submitted a feature request and the amazing Chuck Hedrick at Rutgers quickly improved the multimedia embed feature.
  • Sakai's Announcements tool has a reorder feature. When we upgraded from Sakai 2.6 to Sakai 2.8 a couple years ago, we enabled this feature but soon discovered that it hadn't received enough quality assurance (QA) time. A few professors reported issues and we engaged Longsight on fixes. In the end, the feature was improved and is working well in Sakai 2.8 and Sakai 2.9.
  • And the list goes on. We've collaborated with Longsight on several other small fixes, whether in Gradebook, Tests & Quizzes, or other tools, to improve the software bit by bit. We've also contributed to improvements to tool documentation for Site Info, Assignments, Web Content, and others.
So, I am proud that as a small institution, we can make a contribution to the Sakai community. And I am very grateful to our partner, Longsight, since they deserve the lion's share of the credit!  I am also very appreciative of the many other collaborators and contributors from institutions big and small, nonprofit and for-profit, that help to make Sakai and other open-source solutions available to the world!

Thank you, everyone! Your contributions make a big difference!

Monday, August 26, 2013

Learn How to Use the "Web Content" Tool in Sakai 2.9

Adding and Editing Website Links with the Web Content Tool

by Alan Regan

On August 13, 2013, Pepperdine University upgraded its learning management system, Courses (powered by Sakai), to the latest release.  Version 2.9 offers many enhancements, including a revision to the Web Content tool.

What is the Web Content tool?  With this feature, you can easily add website addresses into your class site's left menu. If there are select websites or web pages you want students to access regularly, placing them in the left menu can make it very obvious and convenient for them.  (You can also add web links into the Resources tool or use the rich text editor in several tools to add links, too.)

To help you understand how to add a website using Web Content and how to force the link to open in a new window, we created the following video:

Video link: http://www.youtube.com/watch?v=zpGcjQHPpTc


TIP: If a website does not appear after you've added it, this may be because your web browser is blocking the content. Check the address you used. Does the address begin with HTTP?  If yes, then the web page will likely be blocked by Firefox 23+ and Internet Explorer 10+.  Consider editing the link to HTTPS or check the box to force the content to open in a new window. Watch the video above for more details.

Learn more:

Wednesday, July 17, 2013

Distance Education Just Got A Little Closer!

Distance Education Just Got A Little Closer!

by Alan Regan & Varun Khanna

In my earlier post on Google Hangouts, I wrote about the benefits of using this new engaging online video tool to work in small groups (less than 15).

But, what if your group or class is more than 15? Pepperdine University's Technology & Learning group suggests Blackboard Collaborate as an online web conferencing platform.

With so many possible tools -- Courses (powered by Sakai), Google Hangouts, Bb Collaborate, Turnitin, Google Drive/Docs -- which tools do I choose?

Let's attempt to reduce the confusion surrounding all these technologies.

1. What is Courses (powered by Sakai)?
Courses (aka Sakai) is the official learning management system (LMS) used by Pepperdine University. It is the online destination where you might post your syllabus, send announcements to the class, administer tests & quizzes, assignments, gradebook, etc. In 2011, Pepperdine University moved over from Blackboard's learning management system to Courses (powered by Sakai). In short, it is the powerful brains behind courses.pepperdine.edu.

2. What is Blackboard Collaborate?
Blackboard Collaborate is an web conferencing platform that allows people to meet online.  It supports up to 200 people to attend a single meeting. Participants can take advantage of live audio, text chat, web camera video, shared whiteboard, application sharing, polling, and many other features.  Blackboard Collaborate is available as an optional tool within courses.pepperdine.edu.

3. What is Turnitin?
Turnitin is a plagiarism detection service that is also integrated into courses.pepperdine.edu. With this tool, professors and students can evaluate the amount of text in student papers that is similar to other sources.  It is a powerful way to educate students about academic integrity.  This service can be enabled by a professor within Assignments tool of Courses.

4. What are Google Hangouts, Drive/Docs, Google+, etc.
Google provides free applications that are hosted online in the cloud. Google Hangouts is a web conferencing service that allows small groups (up to 15 if you are using google.pepperdine.edu) to interact using audio and video. Google Drive is an online storage solution that offers up to 30 GB of total storage space. Within Google Drive are Google Docs -- mini applications that are similar to Microsoft Office.  A Google Document is like Microsoft Word, Google Presentation is like Microsoft PowerPoint, and Google Spreadsheet is like Microsoft Excel.  They share many common features with the Microsoft Office suite, but are not as robust.  These online documents allow multiple people to work simultaneously on a project or paper and are saved automatically every few seconds. Finally, Google+ is a social networking service similar to Facebook.

Let us turn our focus back to Blackboard Collaborate.

10 Things You Always Wanted To Know About Blackboard Collaborate:

1. Plug in your microphone and headset FIRST. This is a very important first step. Be sure that you have connected your headset to your computer before you start a Blackboard Collaborate session.  (If you plug in after you've started a session, the software may not recognize your device!) We also recommend a headset to avoid a majority of audio issues. After you've connected to Blackboard Collaborate, run the Audio Wizard to confirm that everything is working properly.

2. Go to browsercheck.pepperdine.edu. A quick scan will reveal whether your browser requires updates. To use Blackboard Collaborate your Java version must be the very latest. If you have an outdated version, click Fix It on browsercheck site.  Alternately, you can go directly to Java.com and download the latest version.

3. Log onto courses.pepperdine.edu using your Wavenet credentials. If you have not already enabled the tool in your site, edit your tools and add it.  It will appear as "Elluminate Live! Bridge."

4. Click Elluminate Live Bridge in the left menu. On the next page you can either Create Session or View Past Recordings.

5.  To create a session follow simple instructions. Click Finish. On the next page you will see a "guest" link.  You can copy this link to distribute to guest speakers or outside participants.

6. On the main page, you'll see the session (if scheduled for today).  When the session is available, click the link and then click the "Join" button.  (Don't accidentally click the guest link!)


7. Blackboard Collaborate is an application. So, it may take a few minutes to load and open depending on your computer and network speed. It is also common that the window may be hidden behind your browser window.  Look for the purple icon in your Windows task bar or MacOS dock.

Important: Once you are in a Bb Collaborate session, check your audio and video. You will not have time during the online class. A best practice is to arrive and check your online session settings at least 15 minutes prior to the given class or meeting time. Your professor most likely will have the bridge (access to Blackboard Collaborate) open at least 30 minutes prior to your official login time.

8. Only 6 people may talk at any given time. So, if the class is 20 or 199 - only 6 people may have the "Talk" button selected. It is a best practice to turn your microphone off when you are not speaking. The group will get distracted and fall behind if all they can do is hear the theme song to Who's Smarter Than a 5th Grader playing on your TV.

9. There are group chat features as well as peer-to-peer chat within Collaborate. If you are posting in group chat -- keep your comments short, to the point and keeping in mind that the entire class can see what you are typing. Peer-to-peer chats cannot be seen by your class (but may be visible to the instructor!).

10. Be patient! Be proactive! And, then be patient again! All online interactive technology tools are a work-in-progress. Slides may take a few seconds to load. Blackboard collaborate will strip all animations out of a Powerpoint presentation. Raise your hand feature is a polite way of asking a question. It takes a few sessions to get used to any online interactive platform. Blackboard Collaborate is no different. Play around with all the features before you attend your first class. You can always call Pepperdine technical support on all five graduate campuses to assist you with a training session. And lastly, turn off your smart phones (we know it's hard but, give it a shot anyways!).

Helpful Resources:
  •     Blackboard Collaborate Support Phone Number: 866-388-8674 (toll-free)


Wednesday, June 5, 2013

Use "Watch" to receive email notifications in Forums


Get Notified! Use "Watch" in Forums

by Alan Regan

You're a professor or a student and you want to receive an email whenever someone contributes to one of your class discussions. How do you do it?  Use the "Watch" feature.


The "Watch" feature is optional and turned off by default. You can access it by clicking the Forums tool and selecting "Watch" in the top menu. Select a desired option and then click "Save."

Please be aware that this feature is site-by-site.  If you want to watch the discussion in multiple class or project sites, you will need to visit each site and save the desired selection.

NOTE: The "Watch" feature is only available on the first screen of the Forums tool.  If you are within a topic or conversation, you can either use the breadcrumb navigation or click the blue reset arrows to return to the first screen.

Monday, April 1, 2013

Browser Spell-Check and the Rich Text Editor

by Alan Regan

Using Browser-Based Spell-Check in the Rich Text Editor


A professor from GSEP wrote me asking why spell-check isn't working in Courses. When I asked for more detail, she explained that she was using the Forums tool and while writing a response to a student she couldn't right-click a misspelled word to pull up the browser's spelling suggestions.  When she right-clicks, other options are appearing (Cut, Copy, Paste) but not the spell-check capabilities.


The central issue is that the rich text editor in Courses (powered by Sakai) will display its contextual menu when you right-click on a misspelled word. There is a very easy workaround to force the rich text editor (CKEditor) to display the browser's contextual menu instead. All you need to do is Control+Right-Click the word.  On a Mac, you'd use either Command+Right-Click or Command+Control+Left-Click to accomplish the same goal.


If you use Mozilla Firefox or Apple Safari and need to use the built-in spell-check, this easy workaround will help you spell like a champ.

Tuesday, March 12, 2013

Checking Your Own Papers With Turnitin

by Alan Regan

Checking Your Own Work With Turnitin

Dotting the i's for your own academic integrity


A professor asked how he can check his own work for citation issues. The professor was working on a journal article with peers and students and wanted to be sure that everything was cited properly before it went to publication. He knows how to set up an assignment to check student work, but he wasn't sure how to check his own work using Turnitin.

It's easy to check your own work with Turnitin by following three simple steps:
  1. Create a project site on Courses (powered by Sakai)
  2. Create an assignment with Turnitin enabled
  3. "Submit as student"
These steps will take about three (3) minutes to create and submit the assignment, plus the amount of time that Turnitin takes to generate the report.

STEP ONE: CREATE A PROJECT SITE


Every professor should have his/her own project site. These are private sites where you can draft content for your classes, collaborate with your peers, and experiment with the features of Courses (powered by Sakai) without impacting your official class sites.

Create a Project Site in Courses and be sure to add the "Assignments" tool.

Time to complete: Approximately one (1) minute.

STEP TWO: CREATE AN ASSIGNMENT WITH TURNITIN


Once you have your project site, you'll create an assignment. You can create a new assignment for each document you wish to check.

Create a Turnitin Assignment in Courses.

Time to complete: Approximately one (1) minute.

STEP THREE: "SUBMIT AS STUDENT"


Once your assignment has been saved, you now need to submit to the assignment yourself. The easiest way to accomplish this is to click the "Student View" button in the toolbar. This will change the view and enable a new link below the assignment, called "Submit as Student." This allows you, the professor, to submit a document to the Assignments tool as if your account was a student account instead of a professor account. This tool does not allow you to submit the document on behalf of a specific student; it simply allows you to take your own assignment and verify that it is working properly.  In this case, it also allows you to upload your document and submit the assignment for Turnitin OriginalityCheck.

  1. Click "Student View"
  2. Click "Submit as student"
  3. Attach your document
  4. Submit the assignment
Time to complete: Less than one (1) minute.
Now, you'll return to instructor view by clicking the blue reset arrows or clicking the "Assignment List" button in the Assignments toolbar. Wait the 10-30 minutes for Turnitin to process your document and then click "Grade" below the assignment title.  (Turnitin says that papers could take up to 24 hours, but it usually doesn't take that long.) Next to your own name in the grade roster will be the Turnitin column and the badge and link will appear once the report is ready. Review Reviewing Report Results for more details on interpreting the Turnitin report.

TIPS AND REMINDERS


  • Keep the selection "None" under "Submit papers to the following repository." You don't want to accidentally save your own document permanently in Turnitin's paper database.
  • Follow the guidelines for Turnitin submissions. For example, submit a Word document less than 10 MB in size for best results, and always include the file extension in the file name (e.g. mypaper.docx).

Thursday, February 14, 2013

What's in a deadline... online

by Alan Regan

So, When's This Thing REALLY Due?

Thoughts on deadlines in online testing with timed tests


Within our learning management system, Courses (powered by Sakai), there is a powerful testing tool called Tests & Quizzes.  This tool can accomplish many assessment goals, from surveying opinions to conducting high-stakes final examinations.  If you want students to take a low- or high-stakes test online, one of the most important questions to ask is: when is it REALLY due?

Why is this important? In a purely online setting, you need to decide whether the due date is for completing an assessment or starting an assessment. In other words, must a student submit before the due date or must he/she at least begin the assessment before the due date?  This is critical when we think about timed assessments online.

For example, let's say you want students to take a one-hour test. The due date is Friday at 5:00 PM. In the "submit by" model, this means that students must start the test by 4:00 PM to have a full hour. However, if they start at 4:58 PM, the internal timer and likely the assessment description will still say it's a one-hour test, but in reality they only have two minutes left. This can create confusion.

The other approach is to treat the due date as a "start by" date. This way, a deadline communicated as a "start by" date would offer students the full time to complete the assessment as long as they start by that date.  We'll review how to accomplish both models.


"SUBMIT BY" MODEL


This is the traditional model of a deadline. In a classroom setting, there's a lot of structure. The class begins at a specific time and ends at a specific time. The deadline is usually by the end of the class and students must physically turn in their papers before the next class begins.  In an online setting, the beginning and ending dates can be fixed or more fluid. The "open" testing period may be two days, while the exam itself may be an hour-long timed assessment, for example. This interpretation of the start and end date/time is where student confusion can happen.

The "submit by" model says that the "due" date is the deadline. This approach can teach students the importance of time management and personal accountability. Students will experience pain when they misinterpret or ignore directions. Some of their work may be lost by not saving or submitting work before the deadline. Professors that choose this approach should be prepared for complaints, especially at the outset. Offering a low-stakes or no-stakes practice exam is strongly recommended to reduce student and professor frustration when using this approach.

To accomplish a "submit by" deadline, we recommend the following settings:
  • Under "Assessment Introduction," clearly communicate that this is a "submit by" deadline. In the Description/Intro field, describe the assessment and be explicit in the settings and expectations. If the deadline is 5:00 PM, it does not hurt to explain that students must begin the assessment no later than 3:55 PM to receive the full time -- students that start after that time must complete the assessment by 5:00 PM despite any time listed on the countdown timer. You can click "Show/Hide Rich-Text Editor" to add emphasis and color to highlight key points. We pad the date by five minute to account for potential time differences between student clocks and the server's clock; the assessment is controlled by the server's clock.
  • Under "Delivery Dates" in the assessment's settings, enter the deadline in the Due Date field (e.g. 03/15/2014 05:00:00 PM).
  • Under "Delivery Dates," enter the same date plus five minutes in the Retract Date field (e.g. 03/15/2014 05:05:00 PM). 
  • Under "Timed Assessment," enter the one hour limit.
  • Under "Assessment Organization," we strongly recommend that you select "Each Question is on a separate Web page" in the Question Layout section. This will insure that student work is saved after they complete each question.
  • Under "Submissions" in the settings, select the option "Late submissions WILL NOT be accepted after the due date" in the Late Handling section.
  • Under "Submissions," check the box for "Saved assessments will be automatically submitted after the retract date passes" in the Automatic Submission section.
  • Under "Feedback," we recommend the option "Feedback will be displayed to the student at a specific date" if you want to release automated scores and feedback. This way, you can set a date after the deadline and not expose answers to students when others haven't completed the assessment yet. If there will be make-up test takers, you may want to set the date several days after the deadline to allow for these make up exams. (For make-up tests, you would create a group for those specific test takers, duplicate the assessment, and release that copy to only that specific group.)
  • For other setting details, refer to our Tests & Quizzes Settings guide.
  • Always save the settings and review them thoroughly before publishing the assessment. 

"START BY" MODEL


In this model, we've decided that the "due date" is the time students must at least begin the assessment. If they start by the due date on a timed test, then they'll have the full amount of time before the retract date to turn in their assessment. You still run the risk of student complaints, but you minimize the risk by setting a time that will align with the assessment's built-in timer.

To accomplish a "start by" deadline, we recommend the following settings:
  • Under "Assessment Introduction," clearly communicate that this is a "start by" deadline.
  • Under "Delivery Dates" in the assessment's settings, enter the deadline in the Due Date field (e.g. 03/15/2014 05:00:00 PM).
  • Under "Delivery Dates," enter the REAL deadline in Retract Date field (e.g. 03/15/2014 06:05:00 PM). We pad the date by five minute to account for potential time differences between student clocks and the server's clock; the assessment is controlled by the server's clock.
  • Under "Timed Assessment," enter the one hour limit.
  • Under "Assessment Organization," we strongly recommend that you select "Each Question is on a separate Web page" in the Question Layout section. This will insure that student work is saved after they complete each question.
  • Under "Submissions" in the settings, select the option "Late submissions WILL be accepted after the due date. However, this applies only to students who have not submitted their work prior to the due date. They will be given one chance to do so and their submission will be tagged as late." 
  • Under "Submissions," check the box for "Saved assessments will be automatically submitted after the retract date passes" in the Automatic Submission section.
  • Under "Feedback," we recommend the option "Feedback will be displayed to the student at a specific date" if you want to release automated scores and feedback. This way, you can set a date after the deadline and not expose answers to students when others haven't completed the assessment yet. If there will be make-up test takers, you may want to set the date several days after the deadline to allow for these make up exams. (For make-up tests, you would create a group for those specific test takers, duplicate the assessment, and release that copy to only that specific group.)
  • For other setting details, refer to our Tests & Quizzes Settings guide.
  • Always save the settings and review them thoroughly before publishing the assessment.

OTHER ONLINE TESTING TIPS

  • Remind students that essay or file upload questions are not auto-graded. Students may panic when they see the initial grade before you've reviewed and assigned grades for manual grading items. Prepare them ahead of time.
  • If you use essay questions, please remind students to save their work regularly. We recommend that students draft their essay in Microsoft Word or another word processor and paste in their work. Students can lose their work if they: (A) fail to save their work often by clicking the "Save" button on the page (especially if time runs out on a timed assessment!), (B) accidentally close their web browser tab or window, (C) click the browser's Back button, (D) accidentally Select All and erase their content, or many other situations. This is why it's their responsibility to save their work regularly.

RESOURCES

  • Pepperdine's Test & Quizzes documentation
  • Clicking the blue question mark (?) icon in Courses will pull up contextual help. The Tests & Quizzes documentation is an excellent resource.


Monday, December 17, 2012

Midnight Assignments - How do you set the date and time?

by Alan Regan

"I have an assignment due at midnight. How do I enter the date and time?"


This tip comes from one of our professors, Dr. Chris Heard of Seaver College's Religion Division.  Dr. Heard had an assignment due at midnight and he wasn't sure how to record the time.  Does he record the time as 24:00:00 (PM) on the day the assignment is due or 00:00:00 (AM) the next day?

Let's say that you want to have students submit an assignment by midnight on Tuesday, June 18, 2013.  You would set the due date to Wednesday, June 19, 2013 at 00:00:00 AM.

Courses (powered by Sakai) will not accept 24:00:00 PM as a valid date.  The correct option for midnight is 12:00 AM the following day or 00:00:00 in military time.

Several other professors have chosen to simply set the deadline to 11:59:59 PM the day of the due assignment as another workaround.

Example 1: Activity is due at midnight on Tuesday, June 18, 2013 (they have all day Tuesday to complete the activity)
  • Assignments: Jun 19 2013 12:00 AM
  • Forums: 6/19/2013 12:00 AM
  • Tests & Quizzes: 06/19/2013 00:00:00 AM
Example 2: Activity is due at noon on Tuesday, June 18, 2013 (they have until midday Tuesday to complete the activity)
  • Assignments: Jun 18 2013 12:00 PM
  • Forums: 6/18/2013 12:00 PM
  • Tests & Quizzes:  06/18/2013 12:00:00 PM

We hope this "time" tip helps you in future assignments!

Friday, October 5, 2012

Evaluating Student Engagement Using the Statistics Tool in Courses/Sakai

by Alan Regan

Creating Custom Reports with the Statistics Tool in Courses/Sakai


As a professor, have you ever wondered whether your students viewed the class syllabus you posted online? Or maybe you're curious if your students are using the materials you've shared with them in the Resources tool? The Statistics tool in your class site can help answer these questions.


Video tutorial: http://youtu.be/kvnt6Nk77-o

  1. Click Statistics in your left menu.
  2. Click Preferences in the gray tool bar.
  3. Select "All Tools" and then click "Update."
  4. Click Reports in the gray tool bar.
  5. Click Add to create a new, custom report.
  6. Click Show to reveal the Title and Description boxes. Enter a title so you can save your report.
  7. Select the type of report you want to generate.
    Visits - how many times participants have accessed your site.
    Events - the tools and activities with which your participants have interacted.
    Resources - the documents, web links, or other materials with which your participants have interacted.
  8. Select the time period, such as "Last 365 days."
  9. Select the participants to include:
    All - will include everyone
    Role - will allow you to select a user type, such as "Student," "Instructor," etc.
    Custom - will allow you to select one or more specific users. You can Control-Click (Windows) or Command-Click (Mac) to select more than one person.
  10. Select the report items to include in the report. Grayed out items are not available for the report type you selected.
  11. Click Save Report.
  12. Click the title of your custom report to view the results.
  13. At the right, click the Show drop down menu to view more rows of data on the same page, such as "Show 200." You can use the arrow buttons next to the Show menu to navigate through multiple pages, if necessary.

Example Reports

"All visits, all users, last 365 days"

Want to see if someone visited your site on the day when an assignment was due? This custom report will verify whether they accessed your site or not.
  • What: Visits
  • When: Last 365 days
  • Who: All
  • How: User, Event, Date

"All events, all users, last 365 days" 

Want to know if they ever viewed your syllabus, visited the Tests & Quizzes tool, or interacted with other tools? This is the report to create.
  • What: Events (Select by tool, All)
  • When: Last 365 days
  • Users: All
  • How: User, Tool, Event, Date

"All resources, all users, last 365 days"

Want to know what documents or web links they've accessed in Resources, Dropbox, etc.? Try this custom report.
  • What: Resources
  • When: Last 365 days
  • Users: All
  • How: User, Resource, Resource action, Date

We encourage you to experiment with the Statistics tool to help you review the engagement level of your students and which materials or tools are the most popular in your site.

Friday, September 28, 2012

Dropping the Lowest Grade in the Gradebook

By Landon Phillips

Gradebook In-Depth: Drop Lowest


A professor recently asked how to drop the lowest score out of a series of quizzes. The process is quite easy and we can accomplish this in the Gradebook tool.

  1. Go to the course.
  2. Click Gradebook in the left menu.
  3. Click Gradebook Setup in the gray toolbar.
  4. Under "Categories & Weighting," select either "Categories Only" or "Categories & Weighting."
  5. Enter the desired categories for your grades. To add more categories, click "Add a Category." In the example below, we've added five categories and numbered them so they display in a specific order.
  6. Select "Enable Drop Lowest."
  7. In the "Drop Lowest" column, enter the number of items you wish to drop automatically from the calculation (e.g. 1).
  8. Click Save Changes.

NOTE: Each Gradebook item in the category must have the same points possible. For example, the professor has 10 quizzes and they are all worth a maximum of 10 points each.


Monday, March 5, 2012

How to embed a YouTube video on Courses/Sakai

By Alan Regan

How to Embed a YouTube Video in the Forums of Courses (powered by Sakai)


YouTube is a resource for both entertainment and education. The videos can contain helpful, controversial, and thought-provoking content. So, how do you post a YouTube video within the Forums tool of Courses/Sakai?

Instructions:


YouTube.com

  1. Visit http://www.youtube.com
  2. Find a video you want to share
  3. Click "Share" below the video
  4. Click "Embed"
  5. Check the box for "Use HTTPS"
  6. Check the box for "Use old embed code"
  7. Copy the code

    Forums tool of Courses (powered by Sakai)

    1. Log into http://courses.pepperdine.edu by clicking "Pepperdine Login" and entering your NetworkID and password
    2. Go to the course or project site by clicking the tab or clicking its name in the "All My Sites" tab
    3. Click Forums in the left menu
    4. Click the desired topic
    5. Click "Start a New Conversation" or reply to an existing message
    6. Enter the message you want to say
    7. Click "Source"
    8. Place your cursor where you want the video to display
    9. Paste the code
    10. Click "Source" again (very important!)
    11. Click "Post"
    NOTE: Embedded videos will be viewable by users with a PC or Mac laptop running the latest Adobe Flash Player add-on for your web browser. iPad and iPhone users may not see the video. We recommend that you embed and provide the link to the source video, too.

      Tuesday, February 14, 2012

      Add a countdown timer to your site

      by Alan Regan

      Add a countdown timer to your class or project site


      A dissertation professor wanted to express the importance of planning ahead. On the home page of her class site, she wanted an obvious countdown timer -- something big, bold, and real-time. Something that would eliminate the possibility of: "Oh, I wasn't aware it was due so soon."

      There are many ways to accomplish this task. I will be using code created by Robert Hashemian from his site http://www.hashemian.com/  To help our Pepperdine faculty, I placed the source code within our Courses/Sakai service to reduce the possibility of service interruption.

      Example:  Open example countdown timer.


      Part One: Create your HTML page in Resources

      1. Go to Resources in your class or project site.
      2. Click Add and select Create HTML Page.
      3. Enter the text you want your students to see on your home page.
      4. Click Source at the top left of the rich text editor.
      5. Place your cursor in the text where you want to insert your timer.
      6. Copy the following code:

        <p>
        <font size="5">
        <script language="JavaScript">
        TargetDate = "04/20/2012 5:00 AM UTC-0800";
        BackColor = "paleturquoise";
        ForeColor = "navy";
        CountActive = true;
        CountStepper = -1;
        LeadingZero = true;
        DisplayFormat = "%%D%% Days, %%H%% Hours, %%M%% Minutes, %%S%% Seconds.";
        FinishMessage = "It is finally here!";
        </script><script language="JavaScript" src="https://courses.pepperdine.edu/access/content/user/alan.regan/public/countdown.js">
        </script>
        </font>
        </p>


      7. Paste the code.
      8. Modify the date and time to your desired countdown "TargetDate." (NOTE: UTC-0800 sets the format to US Pacific time.)
      9. Click Source again.
      10. Click Continue.
      11. Enter a Name for the page (e.g. Home Page).
      12. Click Finish.

      Part Two: Copy the link to your new HTML page

      1. Click Actions next to your new HTML page.
      2. Select Edit Details.
      3. Scroll down.
      4. Click Select URL (for copying) next to "Web address (URL)."
      5. Copy the highlighted text.

      Part Three: Modify your Home tool

      1. Click Home in your site's left menu.
      2. Click Options.
      3. Scroll to the bottom.
      4. Place your cursor in the box next to "Site Info URL."
      5. Paste the HTML page link in the "Site Info URL" box.
      6. Click Update Options.
      Your revised Home tool should now display your HTML page and your countdown timer.

      If you consider yourself pretty handy with HTML and want to modify the color scheme of the script, feel free. You can find color names at the following W3Schools.com site

      IMPORTANT: You cannot enter the above code directly onto your Home page's text editor. You must use the HTML page method for the code to render properly. If you follow the above steps, it will work correctly.

        Tuesday, November 15, 2011

        Sharing a Table of Information in Sakai

        By Alan Regan

        A professor inquired about sharing a table of information with his students. He wrote asking how to "... create a table of text that can be edited in the Resources section of Sakai. Right now I'm having to keep updating a Word document with each addition of information and it would be easier to do this in Courses."

        Here are a few options to consider:
        1. Create an HTML document in Resources
        2. Create a Google doc or spreadsheet and share the link in Resources
        Create an HTML Document in Resources

        Using the rich text editor, a professor can create an HTML page in Resources (Resources > Add > Create HTML Page). Clicking the Table button in the rich text editor, the professor can specify the number of rows and columns desired. Once created, the professor can easily add or delete rows/columns by right-clicking in the row or column and making the appropriate selection.

        Whenever the professor needs to update the information, he/she would return to Resources and edit the page (Actions > Edit Content). If the professor is familiar with HTML, he/she can click the "Source" button and modify the source HTML code to customize the table design with more detail.

        Create a Google Doc or Spreadsheet and Share the Link in Resources

        Pepperdine University offers Google Docs for Education for our community. It's available at http://google.pepperdine.edu

        The professor can use the Google Docs service to create a new document or spreadsheet and create the table of information as desired. When sharing the document, click "Change" to modify the permissions. Select "People at Pepperdine University with the link" or "Anyone with the link" if the professor may have non-Pepperdine University participants such as guest lecturers. NOTE: Think carefully. Don't enable editing unless you want all class participants to be able to edit the document.  Also, if you select "anyone with the link" then if participants in the class post the link online or email it to others, then anyone with access to the link can see the information.

        Copy the link from the Google document. Return to Courses and go to Resources in the course site. Add the link by clicking Add > Add Web Links (URLs). Paste the web address and give it a title (if desired). Click Add Web Links Now to post the link.

        There are likely other solutions to this need, too.  We hope this information helps!