Showing posts with label lms. Show all posts

Tuesday, August 18, 2015

The Web Content Tool in Courses (Powered by Sakai)


The Web Content Tool in Courses (Powered by Sakai)


By John Buckingham

A critical component of setting up a course site in Courses (Powered by Sakai) is directing students to the proper resources and tools they will need throughout the class. One such resource is an external website(s) like Adobe Connect where synchronous class sessions will be held. Enter the Web Content tool in Courses.

To add it, simply click on the Site Info tool in the desired course site.


There, select Edit Tools.


Scroll down and check the box next to the “Web Content” tool and then select Continue.


  At this point, you will be prompted to title this web content resource. In this example, I’ll title it “Adobe Connect.”


In the source field, I can supply the URL link to my Adobe Connect classroom. 


NOTE
To access this resource through a new browser tab, It is highly recommended to supply the link with the prefix “HTTP” (and NOT “HTTPS”). So if you copy and paste your Adobe Connect link, be sure to remove that S, as this will force Courses (Powered by Sakai) to open the Adobe Connect classroom in a new web browser tab. Don’t worry, connecting to Adobe Connect in this way is still secure.


 After you have supplied the correct URL, click Continue.


Then followed by Finish.


Now, you’ll have the new tool in the side toolbar titled appropriately.


And for the grand finale, when I click the Adobe Connect Web Content Tool, it opens up in a new browser tab, just as I wanted it to. Highlighted in red below is the Courses Tab, where I can click to return at any time.


See? That wasn’t so bad. Now you can add whatever external URL resources you wish to your course site and make sure that students can stay on Courses (Powered by Sakai) in their web browser.

If you have any questions, please don’t hesitate to contact us at Technology & Learning for a consultation!

Best,
John C. Buckingham III


Monday, March 16, 2015

Email Archive Tool as an Alternative Mechanism for Announcements in Sakai

Email Archive Tool as an Alternative Mechanism for Announcements in Sakai


By John C. Buckingham

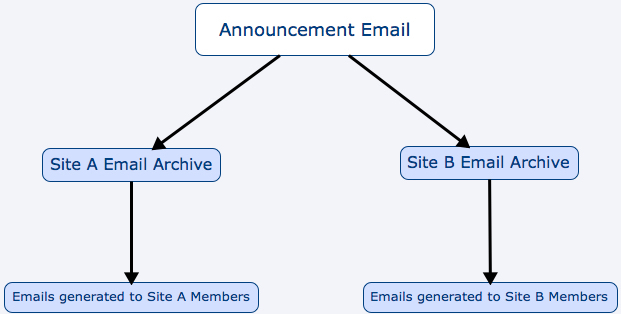
Not too long ago, a Pepperdine University professor came to the Technology and Learning group with a unique request: She wanted the ability to forward announcements from one course to another course. That is, she wanted to post announcements to Sakai Site A which would email Members A and then forward to Site B which would email Members B. But Could the Announcements Tool accomplish this task?


The Announcements Tool is a fantastic valuable “out-of-the-box” tool for updating and reminding students of important upcoming events, assignments, tests and the like. While it’s possible to merge announcements from Site A to Site B, this method does not automatically generate emails to members of Site B after the merge.

So what’s the alternative? Enter the little-known Email Archive Tool. This tool allows you to keep a record of all class communication and centrally store it on your course site. But more than that, however, is the utility of managing a single email address for the entire class (1). This email address can be customized to suit your course site. In effect, this serves as an alternative method to the Announcements Tool. As you can see, the first email I sent to the course can be seen below (2). Simply click on the subject to view the contents of the message.


In addition, you can also change the name of the Email Archive Tool and call it “Announcements” instead. This will intuitively guide students to check this tool for new announcements.

To return to the above scenario, we guided the professor into implementing the email archive tool on both Site A and Site B. To send an announcement, the professor need only email both sites with the same email.  Not only would the email be stored on the Site archive, but also the members would each receive a copy by way of email!


The Email Archive Tool is an excellent tool to accomplish the above purpose, but it can also just be a great method for storing important messages on the Sakai course site. If you have any questions for how to leverage this tool even further, don’t hesitate to contact us at the Technology and Learning group for a consultation!

Tuesday, February 14, 2012

Add a countdown timer to your site

by Alan Regan

Add a countdown timer to your class or project site


A dissertation professor wanted to express the importance of planning ahead. On the home page of her class site, she wanted an obvious countdown timer -- something big, bold, and real-time. Something that would eliminate the possibility of: "Oh, I wasn't aware it was due so soon."

There are many ways to accomplish this task. I will be using code created by Robert Hashemian from his site http://www.hashemian.com/  To help our Pepperdine faculty, I placed the source code within our Courses/Sakai service to reduce the possibility of service interruption.

Example:  Open example countdown timer.


Part One: Create your HTML page in Resources

  1. Go to Resources in your class or project site.
  2. Click Add and select Create HTML Page.
  3. Enter the text you want your students to see on your home page.
  4. Click Source at the top left of the rich text editor.
  5. Place your cursor in the text where you want to insert your timer.
  6. Copy the following code:

    <p>
    <font size="5">
    <script language="JavaScript">
    TargetDate = "04/20/2012 5:00 AM UTC-0800";
    BackColor = "paleturquoise";
    ForeColor = "navy";
    CountActive = true;
    CountStepper = -1;
    LeadingZero = true;
    DisplayFormat = "%%D%% Days, %%H%% Hours, %%M%% Minutes, %%S%% Seconds.";
    FinishMessage = "It is finally here!";
    </script><script language="JavaScript" src="https://courses.pepperdine.edu/access/content/user/alan.regan/public/countdown.js">
    </script>
    </font>
    </p>


  7. Paste the code.
  8. Modify the date and time to your desired countdown "TargetDate." (NOTE: UTC-0800 sets the format to US Pacific time.)
  9. Click Source again.
  10. Click Continue.
  11. Enter a Name for the page (e.g. Home Page).
  12. Click Finish.

Part Two: Copy the link to your new HTML page

  1. Click Actions next to your new HTML page.
  2. Select Edit Details.
  3. Scroll down.
  4. Click Select URL (for copying) next to "Web address (URL)."
  5. Copy the highlighted text.

Part Three: Modify your Home tool

  1. Click Home in your site's left menu.
  2. Click Options.
  3. Scroll to the bottom.
  4. Place your cursor in the box next to "Site Info URL."
  5. Paste the HTML page link in the "Site Info URL" box.
  6. Click Update Options.
Your revised Home tool should now display your HTML page and your countdown timer.

If you consider yourself pretty handy with HTML and want to modify the color scheme of the script, feel free. You can find color names at the following W3Schools.com site

IMPORTANT: You cannot enter the above code directly onto your Home page's text editor. You must use the HTML page method for the code to render properly. If you follow the above steps, it will work correctly.

    Tuesday, November 1, 2011

    Interesting Discussion on Sakai and Desire2Learn on Inside HigherEd

    By Alan Regan

    Members of both the Sakai and Desire2Learn communities are discussing the situation where Blackboard and Moodle seem to dominate the news, yet both Sakai and D2L are viable and robust with large user communities. This is in response to a request from Joshua Kim for more information about the platforms.  He titled his request, "Please Push Back on my D2L & Sakai Biases."

    Since we recently transitioned from Blackboard to Sakai at Pepperdine University (and since many other institutions are doing so, too), I felt this was a fascinating thread.  I hope you find the information as interesting as I did!

    LINK: http://www.insidehighered.com/blogs/technology-and-learning/please-push-back-my-d2l-sakai-biases