Showing posts with label classroom. Show all posts

Thursday, August 21, 2014

Google Classroom

Unpacking Google Classroom: What it Does and What You Need to Know

by Alan Regan

There has been quite a bit of buzz about Google Classroom for the past several months. Back in May, Google launched a PR campaign and asked interested teachers to sign up for a preview.  It started with a limited set of folks, then in July they started to roll out more and more sneak peeks.  Now Google has officially announced the release of Google Classroom to all Google Apps for Education customers.

What Can You Do With Google Classroom?

Google Classroom is new. As such, it only has a small number of features. If professors are expecting equivalent features to a full-blown learning management system, they will be disappointed. However, Google likely plans to build on this platform and roll out additional functionality over time. In the meantime, what can Google Classroom help you do today?
  • Announcements. Professors can post text announcements that appear in the "classroom" in the announcement stream. The announcement can include a file attachment, link to a Google Drive item, YouTube video, or website link.
  • Assignments. The teacher can create a basic assignment that students can submit for grading.
  • Course Description. In the "About" area, the teacher can post a description for the class, list the room details, and post materials.
  • Email. From the "Students" area, a professor can email individual, select, or all students through Google Mail integration.
  • Invite Students. To populate the class with students, the teacher can "Invite" the participants to join the class.
  • Materials. At the bottom of the "About" area of a class, the teacher can upload attachments, link to existing Google Drive items, link to a YouTube video, or share a website link.
 If you explore or experiment, you'll see that it has a similar feel to Google+ since the main page is the "stream" where postings of announcements and assignments can be found.

So What Is Missing from Google Classroom?

While Google Classroom is interesting to explore, it would be difficult for a university professor who expects more advanced functionality to teach with this tool. Again, it is likely to expand over time, but as of this writing the service is missing some core functionality:
  • No Gradebook. While professors can create assignments and grade each student within the assignment, there isn't a central gradebook to summarize the overall progress of each student.
  • No Automated Course Creation. At this time, there isn't a mechanism to automatically create classes based on official class data from WaveNet.
  • No Automated Student Enrollment. At this time, there isn't a mechanism to automatically enroll or unenroll students based on official school registrations. Professors must "invite" students manually and students must accept the invitation (or join by using a join code).
  • No Plagiarism Detection. There isn't a tool or feature to scan an assignment submission for potential plagiarism. Google is the master of search, so perhaps this could happen in the future.
  • No Sequenced or Modular Learning. While there is a stream where you can scroll back chronologically to past announcements or assignments, and an area in the Abour section to post materials, there isn't a place to create a series of text and media rich content for learning modules or lessons. 
  • And the list goes on...

What are the Gotchas?

With any system, there is usually a set of gotchas or known issues. The key gotcha relates to the assignment process. Actually, it's not as much of a gotcha as a "be sure to be aware" notice.

When a student submits a document to a Google Classroom assignment, that document will transfer from the student to the teacher's Google Drive folder (moving it) and switching the permissions.  The teacher becomes the owner and the student will now only have view privileges. On return of the document to the student, however, the professor's permissions shift, the student becomes the owner (and if the professor wants to edit the document, he or she will need to request permission from the student). So it's key that both teacher and student understand these permission and location items.

Wishlist Items

  • Integration of Hangouts.
  • Integration with Sites (or similar or something new) to create structured learning opportunities.
  • Plagiarism Detection.
  • Gradebook.
  • LTI Integration to plug Google Classroom into learning management systems or visa versa.

If a Pepperdine Professor Wants to Explore...

Google Classroom is enabled on our Pepperdine Google Apps for Education service. Professors simply need to visit http://classroom.google.com, log in with their Pepperdine University Google Apps account, choose "Teacher," and explore away!

Conclusion


In summary, Google Classroom is a basic tool with promise.  It seems perfect for K-12 teachers in schools that don't have a central learning platform.  For higher education, though, it is not poised to replace a formal learning management system. At least not right now.  We'll keep an eye out and see what new features or enhancements Google may roll out down the road.

Resources:

Tuesday, August 5, 2014

Windows 8 Shortcuts for Presenters

When you Forget Your Laptop Function-Key Combo:

Windows-P to the Rescue for Presenters

by Alan Regan

Anyone who trains professors with classroom technology has a few key items on a checklist:
  1. Do you have the correct display port, adapter, or cable to connect to the room projector?
  2. Do you have a backup copy of your presentation file (hard drive, flash drive, and cloud storage)?
  3. Do you know how to send your display content to the projector?
For #3, it's critical that a professor can confidently send the presentation to the classroom projector or display. While many modern laptops will auto-detect and enable the display capabilities once an external display is connected, this isn't always the case.  For Windows-based machines, it gets a little more complicated since since almost every manufacturer has a different set of Function (Fn) key combinations to switch on/off the presentation mode of a laptop.  For example, most Dell laptops use the keyboard combo Fn-F8 while many HP laptops may use Fn-F4.

Thankfully, there is an even easier and consistent way to push the presentation display to a projector in Windows:

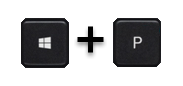
Windows-P

"Windows" stands for the Windows key, often with the Windows logo on the keyboard.  The "P" stands for "Presentation Mode." Pressing and holding the Windows key and then tapping the "P" key will display the available options: "PC Screen Only," "Duplicate," "Extend," or "Second Screen Only."  Professors will commonly select "Duplicate" to mirror the display on their laptop to the projector or display, or "Extend" to keep their laptop content private and move selected windows to the second display. The "Windows-P" shortcut is available in Windows 7 and Windows 8.
  • "PC Screen Only" - means that the computer content will only appear on the main display, commonly the built-in display of the laptop or a connected monitor on a desktop. No information is sent to the secondary projector or monitor.
  • "Duplicate" - means that the computer content will be mirrored (appear identical) on both the main display and the external display/projector.
  • "Extend" - means that the "extended desktop" feature will be enabled. The main or laptop display will have the primary operating system interface while the external display/projector will act like extra screen space. Professors would drag an application window over to the secondary display to show to attendees. This can be helpful if the professor wants to preserve some information for his/her "eyes only" and selectively move content to the projector for attendees to view.  Advanced presenters can switch which display is the "primary" and which is the extended secondary display through the "Display" Control Panel.
  • "Second Screen Only" - means that the display signal will only be sent to the external display/projector and the main or built-in laptop display will go dark. This can be helpful is a laptop's video capabilities are poor and can only support one display at a time.

Alt-Tab


Another tip for presenters is smoothly moving from one application to another. For example, moving from a PowerPoint presentation to a web page.  Rather than exiting PowerPoint and fumbling through application windows, try quickly toggling to your destination with the keyboard combination: "Alt-Tab." Press and hold the "Alt" key on your keyboard and tap the "Tab" key. Keep holding the "Alt" key and either tap the "Tab" key to move forward, "Shift-Tab" to move back, or simply use the arrow keys to navigate the available windows. Once the desired window is highlighted, release the "Alt" key to switch to that window in a snap!

Other helpful presenter shortcuts

  • Use Presenter View. In PowerPoint, use "Presenter View" to display the slide show on the projector but have presenter details (timer, notes, slide selection) on the laptop or primary display. In the Slideshow ribbon, make sure "Use Presenter View" is selected.
  • Quickly "B"lack the screen. In PowerPoint, press the "B" key during a presentation to "B"lack the screen temporarily. The period key (".") will also accomplish the same effect. This is very helpful to focus attention to the presenter rather than the screen. Press the "B" or "." key again to return to the current slide.  (If you prefer a white screen, press "W" to "White" the screen. The comma (",") is the equivalent.)
  • Start your presentation in a jiff.  In PowerPoint, press "F5" to start a presentation from the beginning or first slide.  Press "Shift-F5" to start from the currently selected slide.
  • End your presentation like a pro. In PowerPoint press the "ESC"ape key.
  • Move through slides with ease. In PowerPoint, there are many ways to navigate your presentation.
    • Next slide: Left mouse click, Space, Enter, Right Arrow, Down Arrow, Page Down, and "N" key will all advance to the "n"ext slide or animation.
    • Previous slide: Right mouse click, Backspace, Left Arrow, Up Arrow, Page Up, and "P" will all move back to the "p"revious slide or animation.
    • Jump to slide via slide number. Press the number for the slide and then press Enter. For example "3-Enter" will jump to the third slide.
    • Jump to slide via thumbnail (Office 2013). Press the hyphen ("-") key and then use arrow keys to select a slide. Press Enter to display that slide. NOTE: Pressing hyphen again will shrink the thumbnails, pressing equal ("=") will increase the thumbnails.
    • Jump back to first slide (Office 2010 and 2013). Press and hold the left and right mouse buttons for two seconds. NOTE: Your experience may vary with this tip. On my laptop, an external USB mouse worked and the pointing stick buttons worked, but the buttons on my trackpad did not produce the desired effect. You could always press the number "1" and press Enter for a quick jump to the beginning, too.

Learn More:


Friday, March 14, 2014

Knowing our Learners


Knowing our Learners

by Keenan Kibrick

Knowing our learners is extremely important to meeting their needs.  The problem however, is we must ask ourselves, how well do we know our students?  Our students are very different learners then we are, and the question becomes how should we teach them?  Should we design classes towards their learning styles, or have them conform to ours?  A mixed path I feel is a great way to do this, and to help these are very good links to articles that help us better understand our students and their learning process to better the education we can provide.

The Key Components of a Learner-Friendly Interface Design


Why I opened it:   I was curious to read about interface design, because I was making videos on the topic.  I wanted to confirm my video knowledge, and to learn a little more about what to add to the videos.

Why I kept reading it:   This article went beyond what I imagined.  It’s not just one article it’s a starting point that lead into many fascinating articles.  Each link is another step to great interface design in an e-learning classroom.  If you have a blended class, online class, or even use Sakai in a face-to-face class this hits so many key points in design it’s almost a crucial read.  It covers 4 primary topics graphic clarity, readability, usability, and learnability.  However, each topic has links to must-reads and they are must-reads.  How learners read on screen was fascinating, and made me realize how I should change my online class design.  It covered so many key issues in education.  Like the idea that students don’t read more than 8 seconds at a time and only read 20% of what we present to them.  The ideas on how to handle this and thought discussions about this issue were fascinating.  Another must read “experience is everything” focuses on design tips to make students experience a class rather than just read it like a website and they are easy to follow.  This website is a 
valuable article that I will reference many times and I recommend faculty also reference. 

It’s perfect for:  Redesigning and online or blended class, using courses as a tool in the classroom, learning more how our students think, designing classes to fit student needs.


How Technology Trends Have Influenced the Classroom


Why I opened it:  Sticking to the theme of design I was curious to see how technology changes the classroom.

Why I kept reading it:   It followed those same philosophies from the design article above.  It highlights primarily how students think and interact with technology.  It gives very good overviews of specific technology facts, and after every overview it presents classroom outcomes gained from these technologies.  The classroom outcomes are very valuable and help reflect on ways we can change our classroom practice.  Great examples gained:  Flipped teaching to meet the needs of the “on-demand” student, and tips to increase interactivity in the class.

It’s perfect for:   learning more how our students think, wanting quick tips to help change classrooms, trying to meet the needs of a changing population of students

Learning Theories Gone Wild – Urban Myths that Hurt Your Learning Designs


Why I opened it:  It was catchy looking and eye appealing, and when I skimmed the article I landed on the last theory and was hooked.

Why I kept reading it:   I almost stopped when I started because it was too font weird and eye distracting.  However, when I looked past the eye distracting fonts and pictures I loved the information delivered.  I loved that it included Myths and more importantly it had ways to move away from the myths.  That was the best part for me.  It wasn’t alternatives but ways to move away.  The line alone was catchy and signaled that they understood change is a process.  Further, when we look at the tips to move away from the myths we see that they are small steps to take to improve classes.  I enjoy small steps some times and I hope many readers will also.  If we can take small steps to improve our practice they will turn into larger steps in the future.  This entire article had great small steps to improve learning.  The last step was all about research proven methods leading the classroom and dispelling the rumors that learners know best.  It’s all about making sure to cater to our students by doing what is proven and what’s best rather than just what the students want.  The rest are equally as insightful and it is a fascinating article that I hope many will read and learn from.

It’s perfect for:   Questioning how we learn (even newer practices), wanting to take small steps to success, reading more on the theory of learning.

Friday, February 28, 2014

Week 4 Links and analysis

Building e-learning

by Keenan Kibrick

Good afternoon Pepperdine University audience, I wanted to have one more link group to focus on the topic of best instructional design practices in the classroom.  I believe these resources are very useful and I hope you will find them useful as well.


Learner help to build e-Learning

Why I opened it:  This article was opened because it appeared to help facilitate a great theory of education, making the classroom based on what students want/need, and seeking out student opinion.  I was curious to see how to improve classes before a class starts based on previous year data.  I always follow this theory after a class finishes, but I was curious to see how the data could be used for the next semester.

Why I kept reading it:  It divides tips for how to reflect on your class before you start it.  It’s all about developing new courses, but it could also be used for someone who is trying to re-develop a course they are teaching. It takes tips from the idea of thinking like a designer with the purpose of teaching to a specific audience.  This designer method is very good for faculty, but even more important in an online class or blended classroom.  Online and blended classes should be laid out as much as possible on day one because more of a class is public at a time in an online environment then a face-to-face environment.  Students need to be able to navigate the different tabs to know what to expect for the class.  Building a fully prepared online class before the first day is very important, and these steps help make sure that the class which is built mirrors best design practices.

For more information about this I also recommend the following Extra Credit Video:


It’s on thinking like a designer.  While the video is for game design I find a lot of it can be applied to class design. Both this video and the article provide great ideas to help prepare for a new class, and how to re-examine to improve a class. This idea overall of thinking like a designer is a great practice and the document really helps follow user experience feedback methods to improve an online class.


It’s perfect for:  Online faculty, faculty who use courses to improve their class, and faculty who want to learn best design practices applied to the field of education

Evaluating eLearning


Why I opened it:  I found the above link while looking at this link.  http://elearningindustry.com/the-anatomy-of-great-e-learning-quiz-questions.  The first link was about ways want to improve the type of questions faculty can provide on exams, and when they mentioned it was about e-learning I was curious to explore the differences between e-learning questions and face-to-face questions.  The article though wasn’t that good, to me, but it did have a link to an article about evaluating our own online classes. This link turned out to be worth it and a great article about evaluating a person’s own online course. 

Why I kept reading it:  It’s a simple short blog post about 3 ways people can also think like a designer for classes.  I highly recommend reading this article after the two posts from the first article.  It talks about user testing in online classes, feedback forms inside classes, and tracking student achievement after a class.  It has great strategies that are worth exploring for a class, and can even expand past the online and blended classroom for ideas.

It’s perfect for:  Class improvement, more info. to think like a designer, faculty who want to read a short but valuable way to re-think the learning process.