Showing posts with label Adobe Connect. Show all posts

Tuesday, August 18, 2015

The Web Content Tool in Courses (Powered by Sakai)


The Web Content Tool in Courses (Powered by Sakai)


By John Buckingham

A critical component of setting up a course site in Courses (Powered by Sakai) is directing students to the proper resources and tools they will need throughout the class. One such resource is an external website(s) like Adobe Connect where synchronous class sessions will be held. Enter the Web Content tool in Courses.

To add it, simply click on the Site Info tool in the desired course site.


There, select Edit Tools.


Scroll down and check the box next to the “Web Content” tool and then select Continue.


  At this point, you will be prompted to title this web content resource. In this example, I’ll title it “Adobe Connect.”


In the source field, I can supply the URL link to my Adobe Connect classroom. 


NOTE
To access this resource through a new browser tab, It is highly recommended to supply the link with the prefix “HTTP” (and NOT “HTTPS”). So if you copy and paste your Adobe Connect link, be sure to remove that S, as this will force Courses (Powered by Sakai) to open the Adobe Connect classroom in a new web browser tab. Don’t worry, connecting to Adobe Connect in this way is still secure.


 After you have supplied the correct URL, click Continue.


Then followed by Finish.


Now, you’ll have the new tool in the side toolbar titled appropriately.


And for the grand finale, when I click the Adobe Connect Web Content Tool, it opens up in a new browser tab, just as I wanted it to. Highlighted in red below is the Courses Tab, where I can click to return at any time.


See? That wasn’t so bad. Now you can add whatever external URL resources you wish to your course site and make sure that students can stay on Courses (Powered by Sakai) in their web browser.

If you have any questions, please don’t hesitate to contact us at Technology & Learning for a consultation!

Best,
John C. Buckingham III


Monday, February 16, 2015

Increasing Engagement of Group Interaction in the Virtual World


By John C. Buckingham III

Group work in the classroom has for a long time been recognized as an effective learning strategy by professors in higher education. The interactive nature of group work prompts students to share ideas, solve problems, elucidate differences, craft new knowledge from multiple perspectives and experiences, and achieve deliverables as a team. But recent research has shown that, though students do enjoy and reap many benefits from group work, the negative aspects of personality conflicts, poorly thought out group composition and sizes, “free-riders,” and the lack of clearly structured tasks and goals often diminish the positive gains for students to some degree*

Another recent study on part-time MBA students confirmed much of the observations above, and though there is no one-size-fits-all strategy for implementing group work across all disciplines, the study did offer a number of important considerations for professors to facilitate valuable, group-work experiences in the classroom. Among them are:
  • Reflect carefully on the strategy and aims of the group work you plan to implement
  • Form “cross-functional” groups of students from different backgrounds to promote interaction and ideation from multiple perspectives
  • Place students in groups earlier on in the term to promote prolonged interaction
  • Clearly define the objectives and tasks for students to complete during the group work
  • Facilitate group work by ensuring that students stay on task and have the adequate resources to accomplish the stated objectives**

Given the challenges that students report on face-to-face group work, it becomes ever more important to reflect on and implement the best practices of group work in the online learning world. Fortunately, Adobe Connect is prepared to face that challenge with Breakout Rooms. These virtual breakout rooms can facilitate a robust group work experience that can easily parallel its face-to-face correlate.

Creating Breakout Rooms

Before creating and designing the breakout rooms in Adobe Connect, think about the goals and aims you have for your class. Come up with clear and concise tasks for students to complete while in their breakout rooms. It is critical that you take some time to design your breakout rooms before your class begins.

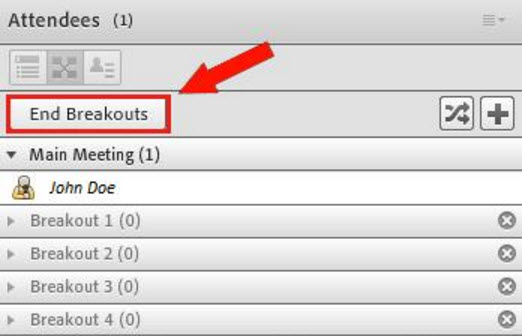
To begin, open your Adobe Connect classroom and click the Breakout Room View in the Attendees Pod (Step 1). This will reveal all of the Breakout Rooms created by default for your classroom. To add additional Breakout Rooms, click the + button (Step 2). Afterwards, click on Start Breakouts (Step 3) so that you can design the rooms.

It is important to understand that Breakout Rooms in Adobe Connect are virtual walls, which can be lifted and lowered at any time. In this way, you can End Breakouts quite easily and even Start them once again to return. Starting Breakouts again returns you to the same rooms you had before, with nothing lost. Try it!

Designing the Breakout Rooms

Note: If you followed along above and ended the breakout rooms, you must Start Breakouts again to design each room.

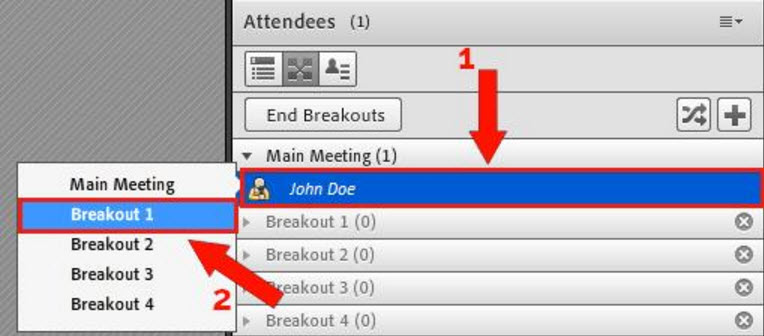
To go to a desired breakout room, click on your name in the Attendees Pod and then select the Breakout Room you’d like to go design first.

For each breakout room, make sure to include a Share Pod that includes content which specifically outlines the group work to be completed. In addition, include a Notes Pod and a Chat Pod for student note taking and participation. The Note Pods can be re-surfaced later for discussion with the entire class.

Once each of the breakout rooms have been designed, you are ready for your class. While you are assigning students to breakout rooms, be sure to designate a student note taker for each group who can track the progress of the work.

While breakout rooms are in progress, it is highly recommended that you visit each breakout room to facilitate the group work process. Students may have questions about the tasks or the material.

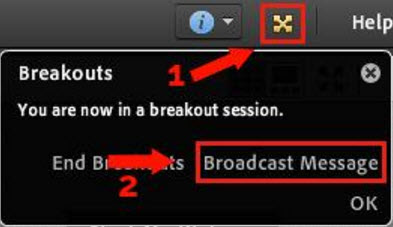
When breakout rooms are about 5 minutes from ending, Broadcast a Message to all breakout rooms that they should wrap up their work. Once 5 minutes have elapsed, you can End Breakouts and resume a normal class discussion.

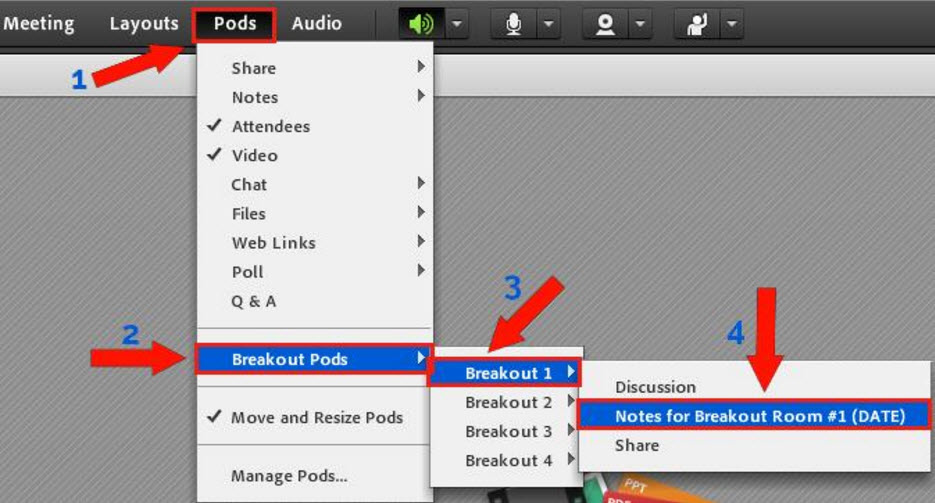
Finally, sharing the outcome of the group work with the entire class is easy! Simply click on Pods, scroll down to Breakout Pods, select a desired breakout room, and then the pod which you’d like to share with the class.


Breakout Rooms in Adobe Connect constitute a robust tool for online group work. Practice these steps on your own to achieve a smooth flow in a live class! And as always, if you have additional questions, you can always contact us at the Technology & Learning Group for a consultation on how to leverage even more utility from Breakout Rooms.


References


* Eva Hammar Chiriac, “Group Work as an Incentive for Learning – Students’ experiences of Group Work,” Frontiers in Psychology 5, (2014): 3, accessed January 27, 2015, http://www.frontiersin.org/Journal/Abstract.aspx?s=346&name=educational_psychology&ART_DOI=10.3389/fpsyg.2014.00558.

** Patricia D. Rafferty, “Group Work in the MBA Classroom: Improving Pedagogical Practice and Maximizing Positive Outcomes With Part-Time MBA Students,” Journal of Management Education 37, (2013): 635-644, accessed January 26, 2015, http://jme.sagepub.com/content/37/5/623.full.pdf+html.


Monday, August 18, 2014

Adobe Connect: What Fonts Are Supported in PowerPoint Uploads?

Adobe Connect and PowerPoint: The Fonts that Work (and other options)

by Alan Regan

Adobe Connect is a powerful tool for online teaching and collaboration. A great feature is the ability  to import content such as PowerPoint presentations, PDFs, or MP4 videos. Professors commonly import PowerPoint files, but sometimes the conversion looks different than what normally appears on their computers. The most common reason is that a font in the PowerPoint is not supported by the Adobe Connect service.

So what's a professor to do?

There are five options to explore:
  1. Use fonts in your PowerPoint that Adobe Connect supports
  2. Save your PowerPoint as a PDF and upload the PDF
  3. Save your PowerPoint slides as JPEG images to add to a new PowerPoint
  4. Save your PowerPoint as a video (MP4)
  5. Embed your fonts in your PowerPoint

Fonts that Adobe Connect Supports

One of the easiest approaches is to focus your presentation design on core fonts that Adobe Connect supports. Adobe reports that Adobe Connect's hosted service runs on Windows servers and supports the fonts that are standard on those systems. The short list to help professors and instructional designers is:
  • Arial
  • Calibri
  • Cambria
  • Candara
  • Comic Sans
  • Courier New
  • Georgia
  • Impact
  • Lucida Console
  • Lucida Sans
  • Palatino Linotype
  • Symbol
  • Tahoma
  • Times New Roman
  • Trebuchet MS
  • Verdana
  • Webdings
  • Wingdings
If you choose this approach, be sure to limit your use to these fonts. Please be aware, there are often derivative fonts that have similar names. For example, there is a font called "Arial Narrow." These derivative fonts are not supported. Similarly, there may be similar font confusion on the Mac, such as Times vs. Times New Roman. Mac users should select the font names that match the list above.  Many of these fonts are provided when a recent version of Microsoft Office for Mac is installed.

For the full list of supported fonts, please visit Microsoft's website.

Save Your PowerPoint as a PDF

Adobe supports PDF documents in the "Share" pod, so another option is to save your PowerPoint presentation as a PDF. When you save a PowerPoint as a PDF, each slide will be a static "page" in your PDF.

Design Considerations:

  • Animations and transitions will be lost
  • Layer multiple bullet point reveals onto separate slides (if you want to focus attention one bullet point at a time)
  • Layer multiple image reveals onto separate slides (if you want to reveal each element one point at a time)
  • Embedded video and audio is not supported (you'd upload the video or audio file and share those elements separately)

PowerPoint Instructions:

The following steps are from Office 2013 for Windows. See the links below for other versions of Office.
  • Once your PowerPoint is ready and designed to flatten to individual pages in a PDF...
  • File > Save As
  • Choose the location on your computer and name the file accordingly.
  • From the "File Type" drop down, select "PDF" (if you have Adobe Acrobat Pro installed, you may be able to select File > Save as PDF directly)
  • Click "Save."
Preview the PDF to verify that each page appears as you desire.  You can then upload this file to your Content area in Adobe Connect or via the Share pod in an Adobe Connect meeting.

See also: PowerPoint 2010 for Windows, PowerPoint 2013 for Windows, PowerPoint 2011 for Mac.

Save Your PowerPoint as JPEG Images

Similar to saving your PowerPoint as a PDF, you can also save your PowerPoint as individual JPEG images.  Each slide is saved as a single JPEG image and you can then create a new PowerPoint file and insert each image onto separate slides. This involves more time than the PDF method, obviously.

Design Considerations:

  • Please refer to the previous design considerations in saving as a PDF.

PowerPoint Instructions:

The following steps are from Office 2013 for Windows. See the links below for other versions of Office.
  • Once your PowerPoint is ready and designed to flatten to individual images...
  • File > Save As
  • Choose the location on your computer where you want to save the files.
  • From the "File Type" drop down, select "JPEG File Interchange Format (.jpg)."
  • Rename the file if desired, else click "Save."
  • When prompted, select "All Slides."
  • When prompted that it will create a new folder, click "OK."
  • PowerPoint will create a new folder with the same title of your original PowerPoint file in the location you selected. Each slide will be an individual JPEG image.
  • You may now create a new, blank PowerPoint and insert each image on new slides. You may need to remove the placeholder textbox on each slide for the image to automatically autofit to the full slide.
See also: PowerPoint 2010 for Windows, PowerPoint 2013 for Windows, PowerPoint 2011 for Mac.

Save Your PowerPoint as a Video (MP4)

This is a hidden gem in modern versions of Microsoft PowerPoint -- many people don't know that this option even exists! If you want to preserve the full experience of your presentation (animations, transitions, etc.), this may be an option to explore. It does require some design setup, such as declaring the transition time (advance slide "after" time) for each slide. To help with this, you can use the "Rehearse Timings" feature to help set these numbers for you.

Design Considerations:

PowerPoint Instructions:

The following steps are from Office 2013 for Windows. See the links below for other versions of Office.
  • Once your PowerPoint is ready, you've set your slide timings, etc....
  • File > Save As
  • Choose the location on your computer where you want to save the file.
  • From the "Save as Type" drop-down, select "MPEG-4 video (.mp4)."
  • Rename the file if desired.
  • Click "Save."
  • Be patient and don't close PowerPoint! Your presentation will now be converted and saved into a video file. The larger and more complex your presentation, the longer it will take to convert.
See also: "Turn your presentation into a video (PowerPoint 2010 Windows)," "Save your presentation as a video (PowerPoint 2013 Windows)," "Save presentation as movie file (PowerPoint 2011 Mac)."

Embed Your Fonts in Your PowerPoint

Full Disclosure: This is only an option for Windows PowerPoint (not Mac PowerPoint). Also, results may vary. We list this option since Adobe has mentioned it as a potential solution, but we caution you that we've had mixed results.

This option involves embedding your custom fonts into your PowerPoint when you save the file. While Microsoft Office allows you to embed both TrueType and OpenType fonts, it seems as if Adobe Connect will only support TrueType fonts. Also, since you're including the font within the PowerPoint file, it will also increase the size of your resulting PowerPoint file, too.

PowerPoint Instructions:

Remember, this option is only available for Windows versions of PowerPoint.
  • Once your PowerPoint is ready...
  • File > Save As
  • Choose the location on your computer where you want to save the file.
  • Name or rename the file.
  • From the "Tools" drop down near the bottom, select "Save options."
  • Scroll down and select "Embed fonts in the file" and the desired option (e.g. "Embed only the characters used in the presentation (best for reducing the file size)").
  • Click "Ok."
  • Click "Save."

See also: "How PowerPoint font embedding and replacement can save your presentation (PowerPoint 2007, 2010, 2013)"


We hope the above options will help you deliver powerful, effective, and professional presentations in Adobe Connect.


Tuesday, November 5, 2013

Why Professors Teaching Online Must Think Like Method Actors and Film Directors

Why Professors Teaching Online Must Think Like Method Actors and Film Directors

by Varun Khanna

Clearly, academia is going through a disruptive phase where students from all over the world believe that their next classroom experience may not come face-to-face from the local college but, half-way across the world via a web conferencing tool like Adobe Connect, Fuzebox or Bb Collaborate.

Even die-hard traditional universities that may have vowed never to join the blended/online classroom experience are now reevaluating their strategy.

So, what can professors do to enhance online engagement experience for their students?

Think - Camera! Lights! Action!
  1. Camera Angle
  2. Lighting 
  3. Background
  4. Color
  5. Movement 
  6. Eye contact 
  7. Punctuate 
  8. Script it 
  9. Rehearse it 
  10. Technique
Laptop Camera Angle
If your laptop camera is not eye-level then you are looking down on your students. If you have too much space on the top, to left or right, then you probably are projecting a diluted version of yourself online.

Lighting
Think soft warm light as opposed to fluorescent lighting that is rarely kind. Pick up a couple of small lamps with warm light bulbs from your local hardware store.  Place a light to your left and right (one closer than the other). Try not to have an overhead light that might create shadows on your face. Remember the Seinfeld episode where Jerry's girlfriend looks rather interesting under different lighting conditions?

Background
Sitting in front of a window during the day teaching an online class? You could be in a silhouette on camera.  If possible, your office desk should be at least 6 feet from the back wall.  If working from home, please take off any clothes hanging behind your home office door.

Color
Think strong colors that compliment the topic being covered in class. Solid colors do well on camera. Stripes, polka dots, plaid - not so much! Now if you are teaching double-declining depreciation - you are on your own!

Movement
Some web conferencing tools might not deliver the optimal frame rate per second that best represents smooth video quality.  Lower bandwidth connections will deliver higher quality video if you limit on-camera movement to a minimum, unless you are teaching P.E. online!

Eye Contact
If your laptop or desktop camera is eye level and you are looking directly into it from time to time, students will be more engaged as you bring content directly into their online world. Look to that green light on your Mac from time to time. If your laptop does not have an "on" light next to the built-in camera, paste a small stickie note next to it.

Punctuate
Online content delivery begs that you carefully punctuate! Punctuation may also come in the form of turning off your camera while your student/s are talking and then turning their camera/s off and turning your camera on to amplify your presence and response.

Script it

Your online class needs an even stronger (might I dare say, dramatic) script than what you would have in a face-to-face class. The script needs careful attention with a beginning, middle and an end. It will need constant revision. After all, your online audience is tiring as the semester progresses and every semester your audience is going to change. One glove fits all simply does not work!

Rehearse it
Even Academy award winning actors need an acting coach. Don’t be afraid to invite a good coach (instructional consultants or peers) to several online rehearsals and performance/s.

Rehearse it! Rehearse it!! Rehearse it!!!

Unless, you are Steven Segal!

Technique

Once you have mastered the technique - forget it! What that means is that as an online teacher you must, yes, must master the technical UI (user interface) of your web conferencing tool and LMS (Learning Management System) and make that second nature. Mastering a web conferencing tool like Bb Collaborate, Adobe Connect or Fuze is imperative. Once you have mastered it - you must forget it so that your students do not see these technology tools as a deterrent to delivering an Oscar worthy performance every time.

Break a leg!