Friday, August 17, 2012

Flipping The Classroom

Transform Your Teaching by Flipping Your Classroom

by Hong Kha

During our faculty professional development program this summer, we encouraged faculty to consider a number of practices to enhance their face-to-face or blended classes. One of these practices is known as "flipping the classroom."

What does "Flipping the Classroom" mean? 


In a traditional classroom, a teacher stands in front of the class and lectures to the students. The majority of time, therefore, is spent in knowledge transfer. In a flipped classroom, the "lecture" material is delivered outside of the classroom. Students watch or listen to recorded lectures or self-paced learning modules at home, in the library, or anywhere with Internet access. This strategy frees up class time for more student-centered, instructor-guided learning activities.

Of course, this isn't a new concept. Educational theorists like Jerome Bruner wrote about discovery learning and constructivism decades ago. Today's learning technologies help professors deliver these educational opportunities and enable students to be more active in their own learning.

Learn more:


We encourage you to explore the following materials and decide for yourselves whether these practices can enhance your classes.

Wednesday, April 18, 2012

Turnitin Updated to Latest Release on Courses (powered by Sakai)

by Alan Regan

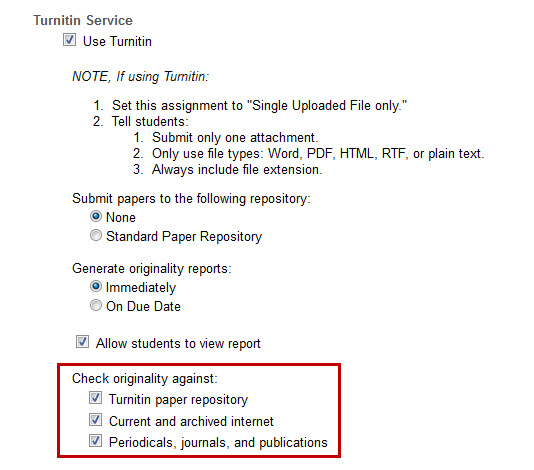
New Turnitin Integration Installed: Edit Your Existing Assignments!


On March 21, 2012, we successfully installed the latest and greatest integration of the Turnitin service to our Courses (powered by Sakai) learning management system. With this new integration, faculty will enjoy more options to customize their use of Turnitin with an assignment.

If you create a new assignment, you'll notice the single "Use Turnitin" checkbox. If you are not using Turnitin, all of the options will remain hidden.  This is nice, since it reduces the text on the screen.  If you choose to use Turnitin, then the options will appear. You'll see right away that you have more options available. By default, a new assignment will be pre-configured to not save papers to the repository ("None"), to generate originality reports "Immediately," to "Allow students to view (the) report," and to check against all three available sources.

If you have an existing, open assignment, it is very important that you check the settings. Be sure that you select the sources you want to check each paper against. If you do not select these options, you will see errors and students will not see originality reports.

We hope you enjoy the updated Turntitin integration and find this information helpful.

See Also:

Great Short Videos on Using Rich Media in Education

by Alan Regan

Rich Media: What is it? Check out this short video series!


Many of our faculty use media effectively in the classroom, whether they teach face-to-face or hybrid/blended classes. If you are exploring the benefits of using media in your classes, I recommend that you set aside a few minutes and watch this short, four-part series on rich media.

Steve Covello of Granite State College of Concord, New Hampshire reviews rich media in depth. He offers an expanded definition and covers both the theoretical and practical benefits of using rich media in instruction.
If you are an instructor, instructional designer, faculty support representative, or a training specialist, you'll appreciate taking the 20 minutes to watch all four videos.

See Also:

Friday, March 23, 2012

Workaround: How to copy content from Internet Explorer 9 into the "Source" of the rich text editor

by Alan Regan

How do I paste content into the "Source" of the rich text editor with Internet Explorer 9?


As new browsers keep coming out, they sometimes create problems with existing websites or web-based services. In Courses (powered by Sakai), Internet Explorer has a problem pasting content into the "Source" option of the rich text editor. It simply won't do it! However, there is a workaround.

Instructions:

  1. Open Internet Explorer 9
  2. Go to a site with embed code, such as YouTube.com or TED.com
  3. Copy the full or old embed code (the version that contains the OBJECT and EMBED tags, not IFRAME tags)
  4. Log into http://courses.pepperdine.edu
  5. Go to your course or project site
  6. Press F12 to turn on the developer tools interface in Internet Explorer
  7. Click Document Mode and switch from Internet Explorer 8 to Internet Explorer 9
  8. The page will refresh (you must be logged into Courses when you do this!)
  9. Use a tool with the rich text editor (e.g. create a new message in Forums)
  10. Click "Source" in the right text editor
  11. You can now paste the code into the "Source" field
  12. Click "Source" again and then scroll down to click "Post" or "Update"
NOTE: The F12 trick is not permanent.  You will need to repeat this the next time you log into Courses if you want to paste content into the "Source" feature of the rich text editor.

We hope this information helps!

Monday, March 5, 2012

How to embed a YouTube video on Courses/Sakai

By Alan Regan

How to Embed a YouTube Video in the Forums of Courses (powered by Sakai)


YouTube is a resource for both entertainment and education. The videos can contain helpful, controversial, and thought-provoking content. So, how do you post a YouTube video within the Forums tool of Courses/Sakai?

Instructions:


YouTube.com

  1. Visit http://www.youtube.com
  2. Find a video you want to share
  3. Click "Share" below the video
  4. Click "Embed"
  5. Check the box for "Use HTTPS"
  6. Check the box for "Use old embed code"
  7. Copy the code

    Forums tool of Courses (powered by Sakai)

    1. Log into http://courses.pepperdine.edu by clicking "Pepperdine Login" and entering your NetworkID and password
    2. Go to the course or project site by clicking the tab or clicking its name in the "All My Sites" tab
    3. Click Forums in the left menu
    4. Click the desired topic
    5. Click "Start a New Conversation" or reply to an existing message
    6. Enter the message you want to say
    7. Click "Source"
    8. Place your cursor where you want the video to display
    9. Paste the code
    10. Click "Source" again (very important!)
    11. Click "Post"
    NOTE: Embedded videos will be viewable by users with a PC or Mac laptop running the latest Adobe Flash Player add-on for your web browser. iPad and iPhone users may not see the video. We recommend that you embed and provide the link to the source video, too.

      Embed a Prezi presentation in a discussion Forum on Courses/Sakai

      By Alan Regan

      How to Embed a Prezi Presentation in the Forums Tool


      Prezi.com is a fun way to put a new spin on presentations -- literally. Through Prezi, you can zoom in, zoom out, spiral, and transition from idea to idea with ease. It's a great way to create a compelling or interactive presentation.

      There are several ways to share your Prezi with your peers on Courses (powered by Sakai):
      1. Link: You can create a simple link that viewers can click and see your presentation on the Prezi.com website.
      2. Download: You can download a portable version of the Prezi that you can share or take with you when giving a presentation on the road (great if the Internet access at a location is questionable!).
      3. Embed: You can grab code to embed the information on your website, blog, or in the Forums tool of Courses/Sakai.
      We will discuss how to embed your Prezi in the Forums tool of Courses.

      Instructions:


      Prezi.com

      1. Locate the presentation you want to share at http://prezi.com
      2. Click "Share" at the bottom right of the presentation
      3. Click "Embed"
      4. Click "Copy Code to Clipboard"

        Forums tool of Courses (powered by Sakai)

        1. Log into http://courses.pepperdine.edu by clicking "Pepperdine Login" and entering your NetworkID and password
        2. Go to the course or project site by clicking its tab or selecting it from "All My Sites"
        3. Click "Forums" in the left menu
        4. Click the topic where you want to post the presentation
        5. Click "Post New Thread" or reply to an existing message
        6. Write the text of your message
        7. Click "Source"
        8. Place your cursor where you want the presentation to display
        9. Paste the code
        10. Click "Source" again (very important!)
        11. Scroll down and click "Post Message"
          NOTE: The code may contain an unsupported tag called STYLE.  After you post the message, if you see this stray code, you can edit the message and remove just this code, leaving everything else.

          Tuesday, February 14, 2012

          Add a countdown timer to your site

          by Alan Regan

          Add a countdown timer to your class or project site


          A dissertation professor wanted to express the importance of planning ahead. On the home page of her class site, she wanted an obvious countdown timer -- something big, bold, and real-time. Something that would eliminate the possibility of: "Oh, I wasn't aware it was due so soon."

          There are many ways to accomplish this task. I will be using code created by Robert Hashemian from his site http://www.hashemian.com/  To help our Pepperdine faculty, I placed the source code within our Courses/Sakai service to reduce the possibility of service interruption.

          Example:  Open example countdown timer.


          Part One: Create your HTML page in Resources

          1. Go to Resources in your class or project site.
          2. Click Add and select Create HTML Page.
          3. Enter the text you want your students to see on your home page.
          4. Click Source at the top left of the rich text editor.
          5. Place your cursor in the text where you want to insert your timer.
          6. Copy the following code:

            <p>
            <font size="5">
            <script language="JavaScript">
            TargetDate = "04/20/2012 5:00 AM UTC-0800";
            BackColor = "paleturquoise";
            ForeColor = "navy";
            CountActive = true;
            CountStepper = -1;
            LeadingZero = true;
            DisplayFormat = "%%D%% Days, %%H%% Hours, %%M%% Minutes, %%S%% Seconds.";
            FinishMessage = "It is finally here!";
            </script><script language="JavaScript" src="https://courses.pepperdine.edu/access/content/user/alan.regan/public/countdown.js">
            </script>
            </font>
            </p>


          7. Paste the code.
          8. Modify the date and time to your desired countdown "TargetDate." (NOTE: UTC-0800 sets the format to US Pacific time.)
          9. Click Source again.
          10. Click Continue.
          11. Enter a Name for the page (e.g. Home Page).
          12. Click Finish.

          Part Two: Copy the link to your new HTML page

          1. Click Actions next to your new HTML page.
          2. Select Edit Details.
          3. Scroll down.
          4. Click Select URL (for copying) next to "Web address (URL)."
          5. Copy the highlighted text.

          Part Three: Modify your Home tool

          1. Click Home in your site's left menu.
          2. Click Options.
          3. Scroll to the bottom.
          4. Place your cursor in the box next to "Site Info URL."
          5. Paste the HTML page link in the "Site Info URL" box.
          6. Click Update Options.
          Your revised Home tool should now display your HTML page and your countdown timer.

          If you consider yourself pretty handy with HTML and want to modify the color scheme of the script, feel free. You can find color names at the following W3Schools.com site

          IMPORTANT: You cannot enter the above code directly onto your Home page's text editor. You must use the HTML page method for the code to render properly. If you follow the above steps, it will work correctly.